Quantcast
Channel: Continuous Lighting – ProPhotoNut
Viewing all 174 articles
Browse latest View live

45 Classic and Fashion Nude Portraits ~ Fuji X-T1

$
0
0
01.

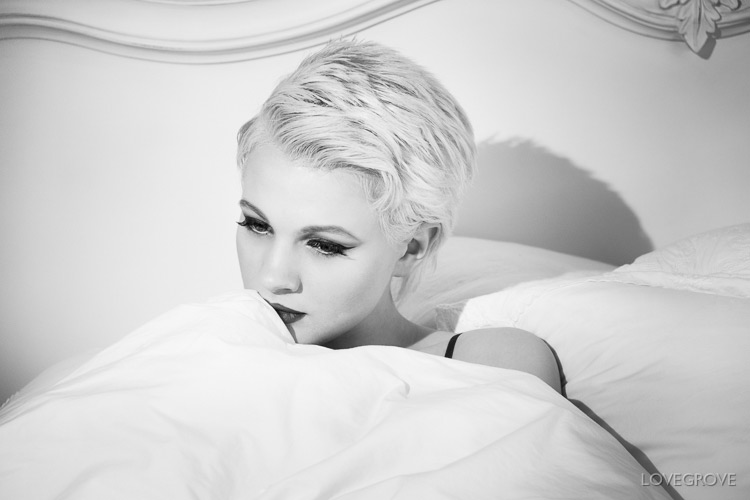
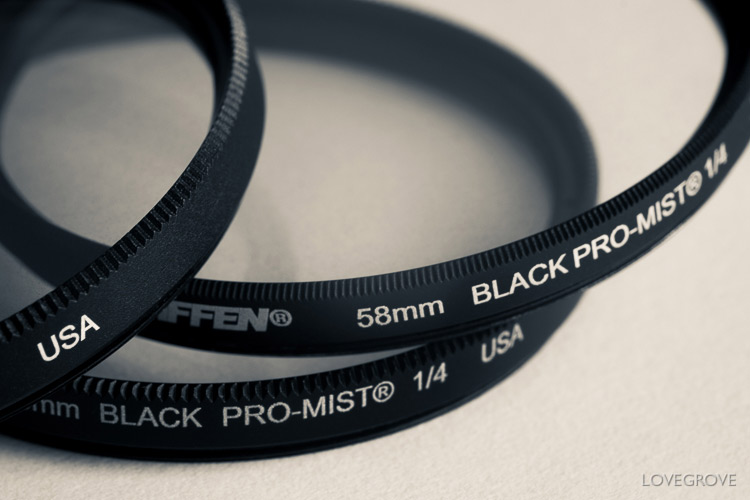
01. Amber Tutton looking sublime. I shot this using natural light with a Fuji X-T1 and 14mm f/2.8 lens. I wouldn’t usually use such a wide lens at this distance but I wanted to pull in the room behind Amber. The drama of the perspective really harmonises with the diffused effect created by a 1/4 strength Tiffen Black Pro Mist filter. I used a two point lighting strategy with controlled natural light.

Here are 45 pictures I took using my Fuji X-T1 in front of an international cast of top photographers. They are a combination of fashion nude portraits and classical portraits. NSFW after the break. Last week I embarked on a creative event like no other. It was dark, cold but exciting. Jean, of Unique Photography Events had invited me to lead this event in London months ago and I must admit I played hard to get at first. I soon softened when I discovered the models we’d be working with. I agreed to light 6 shooting zones and to give 4 hours of masterclasses over the 2 days.

The Event: A creative shoot experience run by Jean Fernand
The Venue: Strawberry Hill House, Twickenham, London
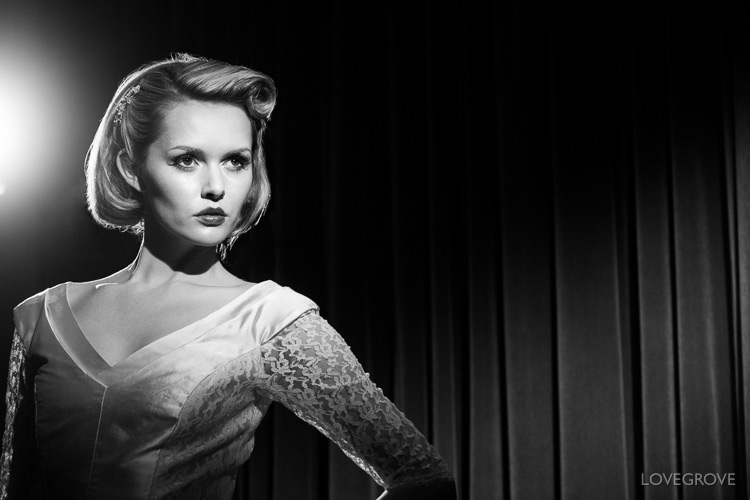
The Models: Jen Brook, Tillie Feather, Amber Tutton, Vicky Burns, Elle Beth and Debbie Field
Corset Designer: Waisted Creations
Skirt Designer: Elizaberry Couture by Elle Beth
Other garments: Joanne Fleming, Chio Couture and Jean Fernand
Stylist Assistant: Patrice Hall
Make up: Tanya Marie Mcgeever and Jean Fernand
Hair: Dylan McConnachie
Director of Photography: Damien Lovegrove

02.

02. Sometimes the best view is down. The tilting screen of the X-T1 was perfect for this shot of Jen Brook. Natural light

03.

03. Tillie Feather’s dance background shows in her natural pose and delicate use of hands. Lit using natural light.

The format of this 2 day event was a new one for me. Jean and I structured each day of the shoot to start with a two hour masterclass where I showed the delegates how I’d light and shoot each zone of the venue. I made the two masterclasses different to benefit those delegates who attended both days. I started with my Fuji X-T1 on my Gitzo monopod and shot mostly using the 23mm lens and occasionally pulling out the 14mm too. I love using a monopod for winter interior portraits because it allows me to keep the ISO sensible. At 11 am, after the masterclass the 12 delegates paired up and shot each of the 6 models in turn, rotating every 40 minutes or so thought the day. The event worked well because it married the learning process with enough personal shooting time to put the techniques learned into practice.

04.

04. I lit Jen with a Lupolux 650 LED spotlight bare faced. I used the barn doors to create a slash of light on the door and kept the left door open to light Jen. I sat on the floor to pull in the ceiling and to create lines with the design.

05.

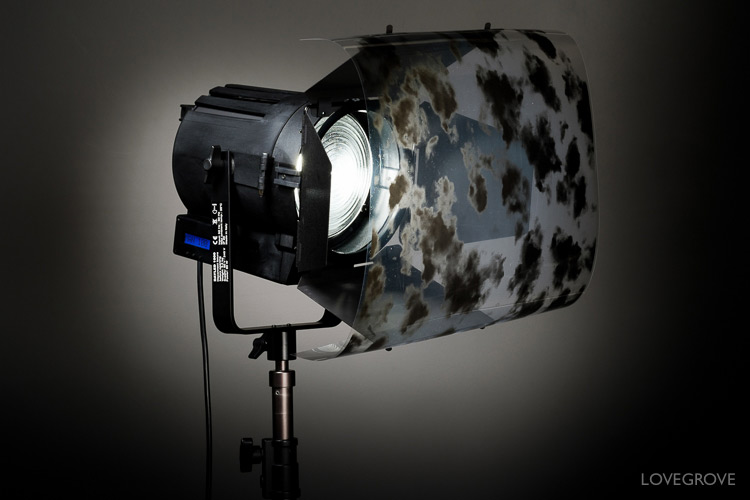
05. Jen was lit with one Lupolux 1000 LED spotlight on the floor above. I added a Scattergel to create the dapple effect. This ability to create multiple shadows is a wonderful characteristic of Fresnel lenses. I used a Lovegrove inverter at the base of the stand to power the light. This avoided trailing wires and kept the shoot zone safe.  I love Jens back combed hair, spiky corset and fabulous skirt, so perfect for the location.

Strawberry-Hill-House-06

06. I lit Tillie from outside the room with a bare faced Lupolux 1000 spotlight and the room was lit with a Lupolux 650 spotlight with an Alto Scattergel. I angled the door to make best use of the studs and panels.

07.

07. Tillie lit by window light. I kept the back of the camera upright to maintain the verticals in the room.

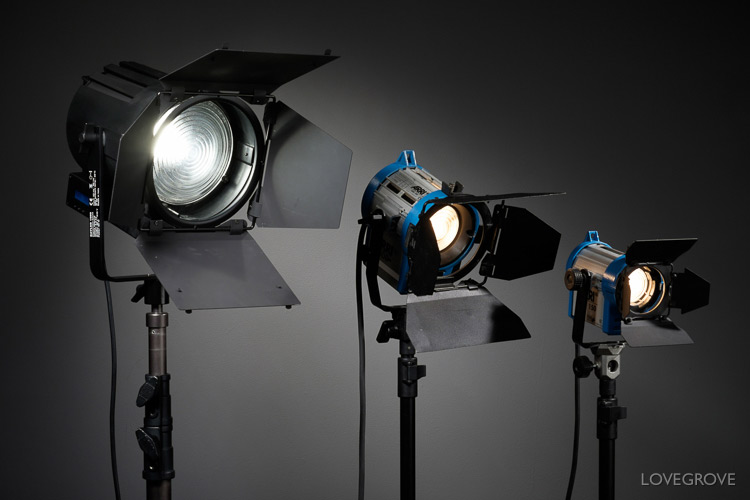
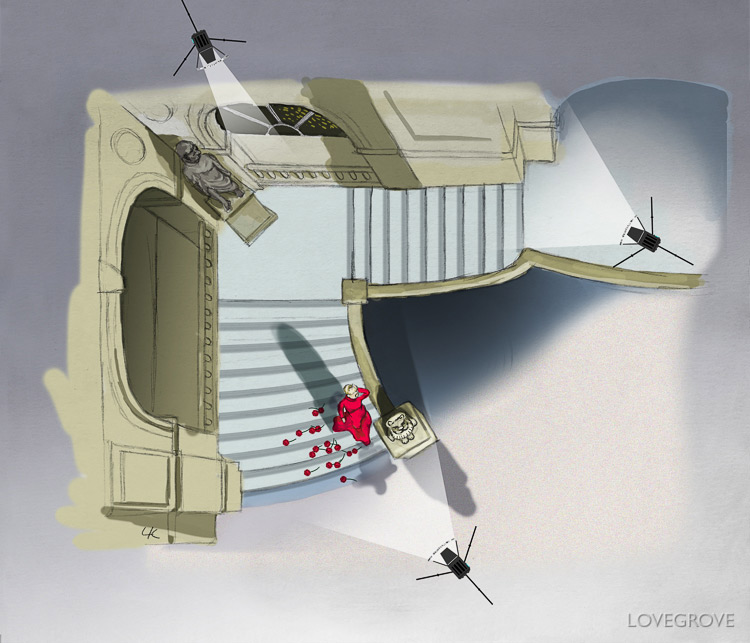
All shoots come with their challenges and at Strawberry Hill House there was no central heating or room lighting, this gave us all a challenge shooting in February. The last hour of each shooting day was in darkness so we had to light every scene. A couple of the delegates brought lights but the main kits were supplied by me. Here is what I rigged:

2x Lupolux 1000 LED Fresnel spotlights with Scattergels
2x Lupolux 650 LED Fresnel spotlights with Scattergels
1x Westcott 5D continuous softlight with a large octabox
1x Ebay softlight with a small rectangular softball and grid
1x Elinchrom Quadra kit with a Rotalux striplight softbox (25cm x 130cm)
1x Cactus RF60 Speedlight in a 55cm Lastolite Ezybox with grid
1x Cactus RF60 Speedlight in an Elinchrom beauty dish via an Ebay adapter
3x Battery packs for the Lupolux lights.
10 lighting stands and a boom arm with a counter weight

Strawberry-Hill-House-11

08. I partly closed the shutters on the window to create a vertical strip light. The forced composition where Elle is on the right of frame looking out is a personal style trait.

Strawberry-Hill-House-09

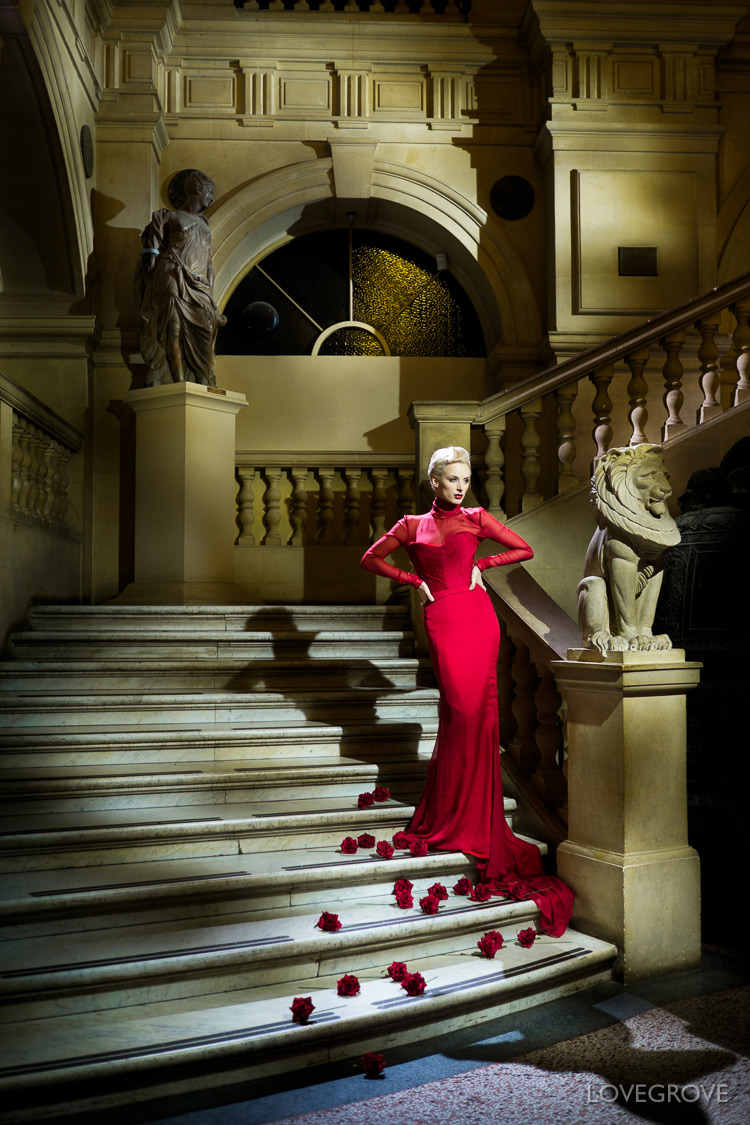
09. I directed Elle to cascade down the step and I shot into the light using the 50-140 zoom lens on my X-T1.

13.

10. Elle sitting in one of the many fantastic fireplaces created by Horace Walpole in the 18th century, Strawberry Hill is internationally famous as Britain’s finest example of Georgian Gothic revival architecture.

15.

11. Tillie Feather delicate and almost demur captured on the Fuji 50-140 zoom at f/2.8. Window light. The Tiffen 1/4 Black Pro Mist filter added some halation to the highlights to give a filmic look.

17.

12. I set Amber deep into the room to light her with the distant light from the window. I shot into the darkest part of the room. Contrast is my friend when I want to sit the background to black.

18.

13. Amber is closer to the same window in this shot.

19.

14. I posed Amber on the floor of the library and shot at 90 degrees to the light coming from the window.

20.

15. Tilly is lit here by a single Lupolux 650 with an Alto Scattergel.

22.

16. Debbie looks amazing in this dress. Natural light.

23.

17. Debbie’s profile is classic and reminds me of Sophia Loren. I partly closed down the window shutters to create a striking portrait with high contrast.

24.

18. All the shutters were closed in the ballroom apart from one to create this striking fashion portrait.

25.

19. A delicate pose while checking her look in the mirror. Wow what a dress!

26.

20. Debbie on the upper landing lit by a Lupolux LED 1000 Spotlight with an alto Scattergel. The light was rigged on the floor below but because the Lowel Grand Stand has a decent maximum height of over 3 metres I could still get the light above Debbie.

27.

21. Lighting is the same as above.

28.

22. I used the 14mm lens to shoot Tillie on the second floor landing. When I get hold of the 16mm lens I’ll be able to shoot scenes like this without such extreme perspective.

29.

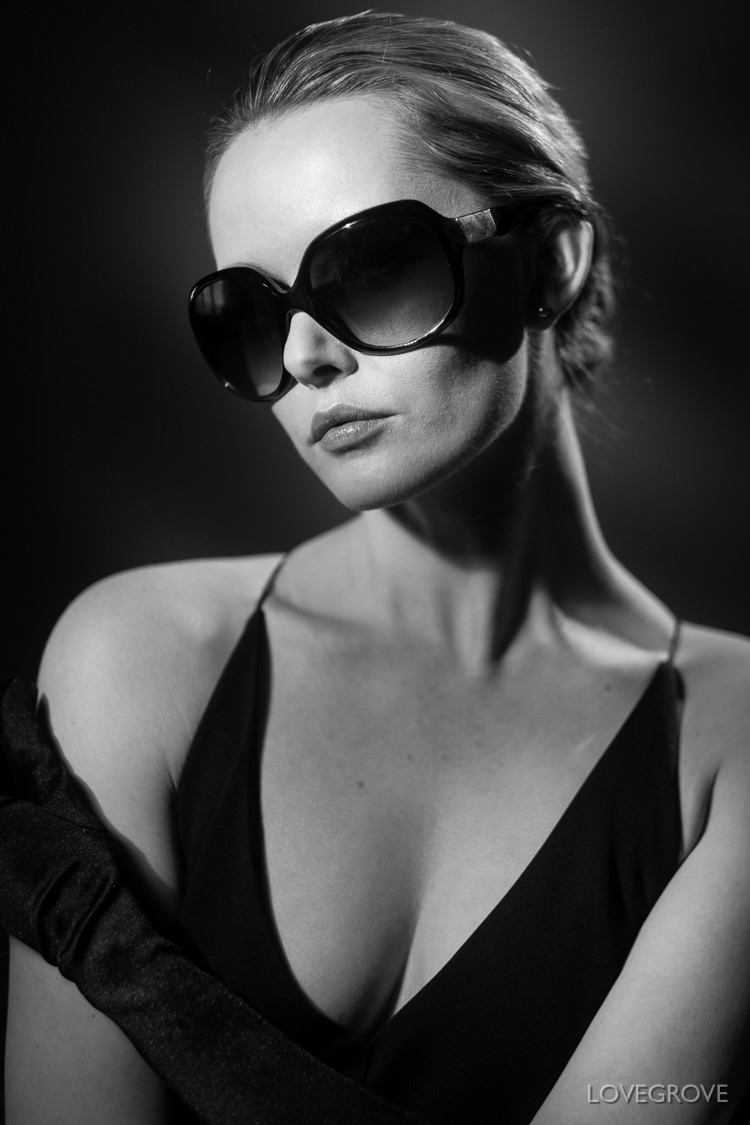
23. This striking shot of Amber is one of my favourites from the shoot. Lit with the light from a window 5 metres away, behind the camera.

30.

24. Beautiful bones, beautifully lit by the window above.

31.

25. Give us a twirl. Lit with a Lupolux 650.

32.

26. I used the same Lupolux 650 to light Amber here. The Scattergel creates the mood.

33.

27. When I started out shooting weddings I always seemed to complain about radiators ruining backgrounds. Now all I see are picture opportunities. I asked Amber to hitch up the top layers of the dress to show the underskirt layers.

34.

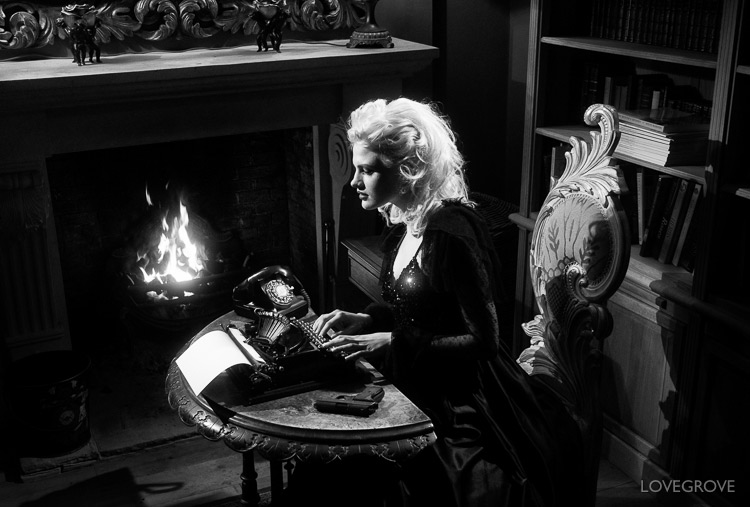
28. Light my fire. We could have done with the heat from the fire but seeing as it was not operational we used it as a shoot spot instead.

35.

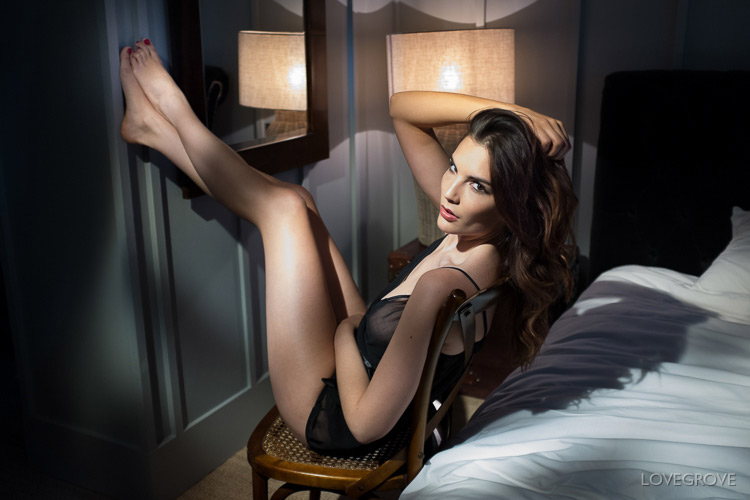
29. I love the 3D quality the 35mm standard lens renders. I lit this portrait with a Cactus RF60 in the Lastolight Eazybox.

36.

30. Tillie’s dancing background came in handy for a set of Black Swan inspired images.

37.

31.

38.

32.

39.

33. Elle was lit with windowlight and the background was lit with a Lupolux 650 Spotlight and venetian blind Scattergel.

40.

34. Debbie was lit from two directions with a Lupolux 1000 with Scattergel from the left and a Westcott 5D with Octabox from the right.

41.

35.

42.

36. Debbie in the library.

43.

37. Elle in a dress worn as a skirt. As ballrooms go this is quite ornate.

44.

38. Closing some of the shutters in the ballroom changed the mood of the light considerably.

45.

39.

46.

40. There are small surprise rooms throughout the house. The walls in this room are a deep green and when coupled with a colourful stained glass window I felt mono was the way to go.

47.

41. A simple head shot of Debbie taken using the light from a window.

48.

42. Debbie in the library.

49.

43. Such a striking profile deserves beautiful light.

51.

44. Debbie in the alcove.

52.

45. Debbie in the ballroom. By 5pm we had lost the light so I rigged an Elinchrom Quadra with a Rotalux striplight softbox over Debbie on a boom arm.

Jean Fernand will be running another event at Strawberry Hill House in June with guest photographer Jessica Lark flying in from the United Stated to lead the event. Places are going fast so do drop Jean an email if you want to attend.

I will be running two country house shoot experiences this year in the UK. Visit PassionPhotographyExperiences.com for more information or better still sign up here to our free newsletter to be kept up to date of new events.

Feel free to comment on these pictures or the lights that I use below.

This post has been read 4,011 times.

The post 45 Classic and Fashion Nude Portraits ~ Fuji X-T1 appeared first on ProPhotoNut.


Carla Monaco in Munich ~ Boudoir, nudes & studio pictures

$
0
0
01.

01. One Lupolux 1000 was all I used for these shots of Carla on the bed.

Here are 60 shots from three days of workshops. All the shots were taken on my Fuji X100t or my X-T1.The ratio is about 50/50. I’ve edited the shots using Adobe Lightroom 5 to replicate a high contrast style reminiscent of printing on grade 4 using Ilford Multigrade fibre based paper especially evident on the images at the end of this article. Enjoy. NSFW after the jump…

The wonderful light provided by the Lupolux LED 1000 or LED 650 lights added to the contrast achieved throughout this set. Hard light from a fresnel lens luminaire is my absolute favourite.

02.

02. We changed the lighting direction and changed the image style. I set the mood of the room with some net curtains clipped onto the curtain tracks and left the rest to my Lupolux 1000 Spotlight.

Model: Carla Monaco
Photographer: Damien Lovegrove
Cameras: Fuji X100T and Fuji X-T1
Fixer and host: Radmila Kerl
Makeup and Hair: Jessica Schletter
Location for Boudoir and Nudes workshops: Hotel Leeberghoff at the foot hills of the Alps in Germany
Location for Studio workshop: Radmila Kerl’s Studio in Munich

03.

03.Into the light so bright with the diffusion coming from my Tiffen Black Pro Mist 1/4 strength filter on the Fuji 56mm f/1.2 lens at f/1.2. We were shooting into my net curtains to get the high key look without seeing the stuff outside.

04.

04. I chose to light Carla with a Lupolux 1000 LED spotlight for the next day’s session at the window. The contrast of the light really defines shape. We went from f/1.2 to f/5.6 once I had added some light. The consequence of this was to reveal some detail through the curtains. Not a problem.

The format for these workshops was quite simple. Days one and two were at a country hotel an hour out of Munich. We hired three suites and worked inside for most of the time. The first day was a Boudoir workshop and day two was a Lovegrove nudes workshop. Then we drove to Munich for day three’s event at Radmila Kerl’s studio. The events were restricted to just 5 delegates each day and delegates could choose to do one, two or all three workshops. We had delegates from Austria, Switzerland, Turkey, Germany and the UK. Every type of camera and experience level accompanied them. The buzz was wonderful.

05.

05. The shot on the left is lit with window light and the one on the bed is backlit with a Lupo. When I assess exposure I don’t use the camera meter or the histogram. I look at the LCD. Does it look how I want it? The shot on the left could have three stops of exposure variation and still be ‘correct’ but only one works for me.

06.

06. The same space, moments apart lit with completely different strategies. The shot on the left is lit with the Lupolux spotlight and an ‘Alto’ Scattergel while the shot on the right is lit with the light from a window.

07.

07. We momentarily popped out onto my balcony to capture the shot at the top lit with a Cactus RF60 Speedlight on a Lastolite Jupiter stand with Lovegrove Flash Bracket. I had my camera settings incorrectly set and got confused with the whole triggering thing. It’s the first time it’s happened to me with the Cactus gear and sods law said it would be on a workshop. It was certainly a learning experience and eventually I sussed out that my Fuji X100T electronic shutter and mechanical shutter option was switched on. We all got the picture before Carla expired from the cold. The shot bottom right has one Lupolux 1000 at 50% power.

08.

08. Window light from the left and a Lupo from the right acting as a backlight.

10.

09. ‘Lovegrove Nudes’ as a genre differs from ‘art nude’ by being more ‘lifestyle’ and encompassing the character of the sitter. What I hate about photography right now are the badges and names given to genres and products. ‘Fine art’ is banded about in photography but it has absolutely nothing to do with fine art. Even ‘fine art’ paper can’t be painted on because it is optimised for ink jet. In days of old it would have been called matt paper. ‘Lifestyle’ is another one. It makes me shudder. I used it above but nobody lives like this. This is just fantasy.

09.

10. The controlled light from a window. I shot these and many more of the shots here using the excellent 50mm – 140mm f/2.8 zoom with it’s 5 stops of stabilisation. 1/60th second wide open at f/2.8 using ISO 400.

10.

11. Top right Lupo and the other two were window light. The ‘S’ curve of light and shadow on Carla’s cheek and Jaw bones are one of my signature lighting styles .

11.

12. You see the ‘S’ curve again here. The wonderful dappled pattern is a result of the Scattergel on the Lupolux 650 spotlight.

12.

13. Mirror lighting takes a certain type of rig. I showed the delegates how to perfect the technique.

13.

14. A Lupolux 650 LED and a Scattergel creates the magic.

14.

15. So many variations.

15.

16. OneLupolux for both these shots. The one on the right uses my mirror trick.

16.

17. A just open curtain give a similar light to a striplight softbox.

17.

18. Carla has amazing eyelashes. I had a set of Eylure ‘Cheryl Cole’ lashes to hand but we didn’t need them.

18.

19. A polished floor makes a great base to a picture and high waisted knickers add a bit of classic glamour.

19.

20. My room balcony was temporarily overlooked by a man up a cherry picker so we shot at the hotel lift instead. I popped a Cactus RF60 Speedlight into a Lastolite Ezybox with grid diffuser. I love how brushed stainless steel reacts to light.

20.

21. This was lit with a Cactus RF60 Speedlight on my Fuji X-T1. Flash on camera rarely works well but it does here.

21.

22. On day three we were in the studio. I showed my delegates how to create classic beauty lighting with just three flash heads and a reflector. Pearls from New Look.

22.

23. Smoke in a can is my take everywhere prop that can spice up any studio session. Vest top from New Look, sheer top from Ebay.

23.

24. I used a pair of striplight soft boxes to light the shot on the left. One light source was the amazing Elinchrom Quadra and the other was a Profoto studio flash unit. The shot on the right was lit with one Lupolux 650 LED spotlight. Tutu skirt by Leg Avenue.

24.

25. Sunglasses from H&M, LBD is the model’s own. I added a ‘Crackle’ Scattergel to a Lupolux 650 at 45% to light the background.

25.

26. It’s all about the curves, shapes angles and design. I bought both of these tops new on Ebay. It’s a great resource for fashion. You see a garment from China, select the size and colour. They make it and ship the same day. It usually arrives in the UK within a week.

26.

27. The soft continuous light from a prototype fixture that houses 5 spiral fluorescents became the key light here. The Lupolux 650 stayed on the background and the Lupolux 1000 became the backlight.

27.

28. The Lupolux 1000 makes a perfect hard keylight and background light in one. The super smooth transition from lit to unlit makes wonderfully smooth gradients on backgrounds. We were just using the white walls of the studio for this complete session.

So there is a taster of what we get up to when we are on location having fun. Fine food, fine wine, fine company, lots of laughs and memories to last a lifetime.

If you want to join me at a fantastic workshop event please request a free membership of the Lovegrove Creative Facebook Group and then visit our Passion Photography Experiences web site. Trips in the pipeline for 2015 are Norway, Denmark, Sweden, Finland, Spain, France, Cambodia, Cuba, UK and South Korea. A busy year ahead!

Please feel free to comment below on the pictures. Ask about post production, camera settings or whatever you want.

This post has been read 13,029 times.

The post Carla Monaco in Munich ~ Boudoir, nudes & studio pictures appeared first on ProPhotoNut.

Timeless ~ The photographs

$
0
0

01. The staircase at Eastington Park was a feature to behold

Here are 38 photographs from the Timeless workshop at the fabulous Eastington Park in Gloucestershire. NSFW after the break

02. Charlotte

Models: Charlotte Atkinson & Carla Monaco
Hair and Makeup: Vicki Waghorn
Concept and Styling: Damien Lovegrove
Photography: Damien Lovegrove

03. Shadows

Timeless-by-Lovegrove-04

05.

06.

07.

08.

09.

10.

11.

12.

13.

14.

15.

16.

17.

These pictures were all taken on a one day workshop hosted by Damien Lovegrove at Passion Photography Experience. There were eight delegates, two models and Damien as tutor and lighting guy.

If you would like to attend a workshop and want to know in advance what’s being arranged ask to become a member of the Lovegrove Creative Facebook group.

Feel free to comment on these pictures below.

This post has been read 1,285 times.

The post Timeless ~ The photographs appeared first on ProPhotoNut.

Fujifilm XF16mm lens ~ picture samples and first thoughts

$
0
0

I’ve been fortunate enough to have a couple of copies of the new Fujifilm XF16mm prime lens so far. The first was a pre production unit I picked up in Japan back in February and I later swapped it out for a newer version at The Photography Show last month in Birmingham. My latest copy has serial number 00029 from the final production run. It came boxed and is in full retail guise. I’ve shot over 1000 frames with XF16mm lenses so far and I love this lens.

01.

01. XF16mm, ISO 200, f/14, 1/180th second. Lit with a Cactus RF60 Speedlight.

I’ll be linking the shots here in this blog post to their full size counterparts as soon as I’m allowed to do so. The full res images sparkle with clarity and will delight the pixel peepers among you. My idea of lens evaluation doesn’t dwell on the microscopic but uses a more holistic approach. I choose a lens because of the way it translates the three dimensional world into a two dimensional image. The overall look and feel of the images a lens captures are of utmost importance. I love to print my work too and the process of producing prints is the most telling step in image quality evaluation.

02.

02. XF16mm, ISO 200, f/2.5, 1/60th second. Lit with a Lupolux LED 1000 spotlight.

Models: Clair Tombs and Chantelle Hole
Dress: Molly Mishi May

Zoom V Prime
Next week I’m off to Spain with a model to do final checks on locations for my September workshops. I’ll be taking my copy of the Fujifilm XF 16mm together with my other primes to compare with the highly praised XF 16-55mm zoom lens that I have on loan. I’ll be shooting the zoom alongside the 16mm, 23mm, 35mm, and 56mm primes in an experiment to see how they compare for portraits and maybe landscapes too. It’s an easy test really. I’ll be blogging my results together with 100% files for you to assess as soon as I am given the go ahead.

The lenses I'm taking to Spain to test. From left to right: XF 16-55mm f/2.8 zoom, XF 56mm f/1.2, XF 35mm f/1.4, XF 23mm f/1.4 and XF 16mm f/1.4 primes

The lenses I’m comparing next week. From left to right: XF 16-55mm f/2.8 zoom, XF 56mm f/1.2, XF 35mm f/1.4, XF 23mm f/1.4 and XF 16mm f/1.4 primes

The XF16mm lens is an exciting bit of kit for me because I photograph people usually at wide open apertures. The extra two stops of aperture over the 16-55mm zoom make a massive difference in subject separation so the images produced wide open by the fast prime will certainly be different to those produced on the zoom. The prime will win out on the electronic Image quality stakes too in the majority of my images as I’ll be able to use a lower ISO for the same ambient light level. OIS on the zoom would have levelled the playing field somewhat but out in bright daylight there will be no difference of course.

What about the optical quality? What about the corner sharpness? What about the overall level of detail and the contrast in the image? These are the questions I’ll be aiming to answer and discuss supported by my full resolution images.

 Weight is another issue. When shooting with four prime lenses the camera bag will be heavier than it would with just the one zoom but as I always put my bag down when I shoot, the lighter camera with a prime lens will be a great advantage over the heavy bulky zoom.

This 16mm prime promises to be Fujifilm’s best lens to date. Do the results of my real world testing prove this? I can’t wait to share my findings with you.

03.

03. XF16mm, ISO 200, f/2.8, 1/100th second.

04.

04. XF16mm, ISO 200, f/1.4, 1/100th second.

05.

05. XF16mm, ISO 200, f/6.4, 1/15th second. (using a tripod)

06.

06. XF16mm, ISO 200, f/3.2, 1/15th second. (using a tripod)

07.

07. XF16mm, ISO 200, f/2.2, 1/500th second. Lit with a Lupolux LED 1000 spotlight.

08.

08. XF16mm, ISO 200, f/1.4, 1/60th second.

09.

09. XF16mm, ISO 400, f/3.6, 1/60th second. Lit with a Lupolux LED 1000 spotlight.

10.

10. XF16mm, ISO 200, f/4, 1/180th second. Lit with one Cactus RF60 Speedlight with a CTB gel as a backlight and an Elinchrom Quadra in a 70cm Rotolux softbox as the key light.

11.

11. XF16mm, ISO 800, f/8, 1/180th second. I lit this shot with an Elinchrom Quadra with the standard diffuser. I chose f/8 to deliver the depth of field needed to render the pebbles and rocks pin sharp front to back and corner to corner.

12.

12. XF16mm, ISO 400, f/2.2, 1/60th second. Natural light.

13.

13. XF16mm, ISO 400, f/2, 1/60th second. Natural light.

I’ll have more to report on this lens very soon. Feel free to ask me questions below.

This post has been read 4,567 times.

The post Fujifilm XF16mm lens ~ picture samples and first thoughts appeared first on ProPhotoNut.

Zoom or Prime lenses for portraits with Fuji X?

$
0
0
xf16-55mm zoom at 16mm and f/2.8 - click on the picture to see it at 100%

XF16-55mm zoom at 16mm and f/2.8 – click on the picture to see it at 100%

This is my real world comparison between the Fujifilm XF16-55mm zoom with the XF16mm f/1.4, XF23mm f/1.4, XF35mm f/1.4 and the XF56mm f/1.2 prime lenses. I often hear statements like prime lenses are better than zoom lenses. Is that so? Let’s find out…

DSCF6309

From left to right: The Fuji 16-55mm f/2.8 zoom, 56mm f/1.2, 23mm f/1.4, 35mm f/1.4 and the new 16mm f/1.4 prime lens. The shadows show their relative sizes quite well. Eagle eyed photographers amongst you will notice the lettering on my primes is blacked out. I used a permanent marker and it’s to stop reflections of the white text on the rear of ND filters appearing in my images. It’s a trick we used to employ at the BBC when using Zeiss Distagons on the Aarton or Arriflex super 16mm cameras. The zoom has to go back and I haven’t used NDs on it hence it still being pristine.

Model: Mischkah Scott
Location: Spain
Camera: X-T1

This is the prime lens shot taken with the new XF16mm at f/2.8

This is the prime lens shot taken with the new XF16mm at f/2.8 – Click the shot to see it at 100% and to compare with the zoom image above. (please note these were compressed as 60% jpegs at about 1.5mb)

Size matters when it comes to lenses. The larger lenses are generally easier to operate especially if you are controlling the aperture, zoom and focus. The 16-55mm lens feels just the right size and the zoom function is super smooth too. Take away the need to zoom and the size of the fast prime lenses seems right too. If you really want compactness in your lens system you can opt for the pancake primes to cover the wide end. These are the 18mm, and 27mm. Pair these up with the 35mm and 60mm and you have a sub f/2.8 prime set up. These lenses offer stellar optics but have traded a fast maximum aperture for size and weight. The apertures are still larger than the zoom so these can be a real choice if size really does matter.

Taken with the XF16-55mm zoom at 16mm with f8 - click for 100%

Taken with the XF16-55mm zoom at 16mm with f/8 – click for 100%

Here is the prime option. XF16mm at f/8 - click for 100%

Here is the prime option. XF16mm at f/8 – click for 100%

Weight on the camera is the one of the most important factors for me to consider when choosing between zoom and prime lenses. How heavy the camera feels in the hand directly affects my shooting frame of mind. If I look at a pro level SLR now I can’t be bothered to lift the bulk to my eye to take a shot. The weight is just unreal and I find it hard work to hold a Nikon D4 or Canon 1Dx let alone use them. The Fuji X series is a super size for me and up until the latest fixed aperture zooms arrived the setup was lightweight too.

The zoom is great for wide close ups when the place the subject is in is needed to tell the story. XF16-55mm_at_16mm_f28

The zoom is great for wide close ups when the place the subject is in is needed to tell the story. XF16-55mm at 16mm f/2.8 – Click for 100%

The prime goes two stops bigger with the aperture and that give a different feel to the shot. XF16mm at f/1.4

The prime goes two stops bigger with the aperture and that give a different feel to the shot. XF16mm at f/1.4 – Click for 100%

Weight in the bag is the least important aspect for me to consider as I always put my bag down to take pictures. I’ve no concerns with the weight of my camera bag even with the substantial 50-140 f/2.8 OIS zoom that I take out from time to time. My bag will always be lighter that the one I used for my SLR kits and I don’t treck up mountains. I use lighting kit a monopod and various other bulky bits of kit when I am out on a shoot so the camera bag weight is not a significant factor in the whole scheme of things. I carry my bag from the car to the location – maybe 100m and that’s it.

This was taken with the zoom at (near) the 23mm position. It's hard to get the exact focal length mid point on a zoom ring but this is close enough. XF16-55mm at 22mm using f/2.8 - zoom for 100%

This was taken with the zoom at (near) the 23mm position. It’s hard to get the exact focal length mid point on a zoom ring but this is close enough. XF16-55mm at 22mm using f/2.8 – click for 100%

Here is the prime lens shot.  I found the prime lenses gave a slightly brighter image than the zoom when set to f/2.8.  XF23mm at f/3.2 - click for 100%

Here is the prime lens shot. I found the prime lenses gave a slightly brighter image than the zoom when set to f/2.8. XF23mm at f/3.2 – click for 100%

Price is a major consideration when choosing between the four prime lenses and the zoom lens. The web price for the 16, 23, 35 and 56mm lenses is £2486 ($3788 or €3477) and the 16-55mm zoom is just £899 ($1370 or  €1258) I say ‘just’ because you get a lot of lens for your money. The savings to be had going down the zoom route is £1587 ($2418 or €2219). For 95% of the time most people who shoot at f/2.8 or smaller will be getting pictures at the same optical quality whatever option they choose. The f/1.4 shooters better start saving.

xf16-55mm_at_34mm_f4

XF16-55mm zoom at 34mm using f/4 – click for 100%

xf35mm_at_f4

XF35mm prime at f/4 – click for 100%

xf16-55mm_at_55mm_f28

XF16-55mm zoom at 55mm wide open at f/2.8 – click for 100%

xf56mm_at_f28

XF56mm prime at f/2.8 – click for 100%

Optical quality is a big issue in most peoples minds but it really isn’t a factor when you choose to go for Fuji zoom or prime lenses. Yes there are a few subtle differences, mainly at f/2.8. By that aperture the primes are already two stops down and nearing their optimum working aperture while the zoom is fully wide. By f/4 there is little between the optics and at f/16 the zoom will deliver better shots with one more stop in hand over the primes on their limit. Of course your choice of optics depends upon the kind of photographs you take. I work in dark interiors so I need the primes. If you shoot landscapes at f/8 on a tripod the zoom will be perfect.

XF16-55mm zoom at 55mm wide open at f/2.8

XF16-55mm zoom at 55mm wide open at f/2.8 – click for 100%

XF56mm at f/2.8

XF56mm prime at f/2.8 – The 56mm lens opens up by over two more stops and that renders the background far more out of focus. It’s not always needed but the effect is delightful in some situations. – click for 100%

Two extra stops make the difference between getting the shot or not. If like me you shoot portraits and are drawn to dark places like caves and cellars you will know just how amazing the light can be in these places. Although the quality of the light is superb there just isn’t much of it. So how would I cope with an f/2.8 lens?  I can’t really drop the shutter speed any further because subject movement starts to be significant when shooting portraits. The aperture is maxed out at f/2.8 so I can only resort to a high ISO to get the shot.

This shot taken in a cave in Spain was captured using the XF16mm prime lens set at the max

This shot taken in a cave in Spain was captured using the XF16mm prime lens set at the maximum aperture of f/1.4. I used a shutter speed of 1/15th second and this was as low as I could go hand held. Out of the 5 frames I shot just 1 showed no signs of subject or camera movement. I shot using ISO 1600 and picked up the highlights half a stop in Lightroom. With the XF16-55 I would have had to resort to an ISO of 6400 and in my experience the shadow details would be lurking in a sea of noise. The frame above was shot on the X-T1 and at just ISO 1600 it will print beautifully. I can imagine it as 1 metre  wide print on aluminium on the wall of an art gallery. I’ll be back in the cave with delegates for my workshops in September.

The Spain workshops are just one of the Lovegrove photography experiences set for 2015. Click on the image for more information from our new website.

The Spain workshops are just one of the Lovegrove photography experiences set for 2015. Join Mischkah and I Southern Spain this autumn for  three days of creativity, fun and inspiration. Click on the image for more information from our new website.

Lens hoods I always use lens hoods. I’ve grown up using lens hoods and I’m not going to change now. I want every bit of optical quality I can get and even when I’m using Black Pro Mist filters I like to control flare with a hood. A lot of photographers have complained about the petal shape hoods because they look ugly. I happen to like them because they are effective. With the zoom however the lens hood is a compromise at all focal lengths except fully wide. It looks as if Fuji are finally going to make a series of dedicated bayonet mount metal lens hoods with rectangular apertures. I hope they are made with precision and are as efficient at removing stray light as they can be. Time will tell.

The new series of hoods for prime lenses will look like this one shown on the 16mm lens. These can't come soon enough as I for one will like using them. Design a good clip on cap for the front of the hood please Fujifilm.

Is this a one off? I hope not and I hope that there is a new series of hoods for prime lenses that look like this one shown here on the new XF16mm lens. These can’t come soon enough. Please Fuji creative team… design a great clip on or locking dust cap for the front of the hood to compliment it. Thanks.

Conclusion We are spoilt for choice but there are definite reasons to choose the zoom over the primes and visa versa. The things that matter at the end of the day are creativity and productivity. Choose the option that will inspire you to get out there and fill your life with the magic of photography.

Feel free to join the debate below. Don’t be hard on my techniques because this isn’t science, this is a real world testing. No tripods were used for these shots and I have no desire to take pictures of brick walls, I just shot regular portraits in various lighting conditions.

I hope this helps you decide what route you will take with your Fuji X lens choice.

This post has been read 7,351 times.

The post Zoom or Prime lenses for portraits with Fuji X? appeared first on ProPhotoNut.

Chantelle Hole dans le boudoir

$
0
0
01.

01. I let a hint of daylight glance into the room under the Roman blind to simulate moonlight. I gave the blue a bit of a boost in Lightroom too. The light on Chantelle comes from a Lupolux LED 1000 spotlight with a Scattergel to break up the light into patches. The light also has a 1/2 CTO gel. There’s more about that gel later in the post. Chantelle is sitting on pillows in a pair of jeans. I try to keep the shoot as comfortable as I can.

Here are 45 photographs taken wide open on my Fujifilm X-T1 with 16mm f/1.4, 35mm f/1.4 and 56mm f/1.2 prime lenses and my X100t with it’s fixed 23mm f/2 lens.  I only used one light and it was a Lupolux 1000 LED daylight balanced spotlight with a colour temperature of 5600k. I used a Scattergel and a 1/2 CTO gel from time to time to warm up the light as required.

Chantelle Hole did her own hair and makeup. Her complexion is amazing and I’ve not done any retouching in Lightroom or Photoshop. My only post production work has been my usual photograph enhancement routine in Lightroom 5 as shown in this video.

Chantelle-Hole-02

02. I used the Lupolux Spotlight from behind Chantelle to simulate sunlight streaming into the room. The rim light in the top picture is from the Lupolux and it looks as if it comes from the distant window. The forward leading shadows in the bottom picture are characteristically hard and look like sunlight. The light from the camera side is coming from a North facing window.

This shoot was a 1:1 training session for an amateur photographer who wanted a first class learning experience to further develop their skills at photographing women. The stayed the night in this boutique hotel bedroom in Bristol and we shot in it the day after. A late (17:30) checkout meant we could shoot all day. Lunch was fabulous too at the pub just 100m away. If you would like to have a 1:1 or a small group training session to hone your photography skills then click here for more information and prices.

Chantelle-Hole-03

03. As you can see in the shot on the right there was a bit of sun from time to time but it never penetrated deep into the room. It came and went but we didn’t need it as we made our own sunlight with the Lupolux. I love not having to rely on the weather to shoot. Everyday is a sunny day with the right light.

Chantelle-Hole-04

04. I like to start a boudoir shoot session with a bit of fun as it gets rid of the nerves and gives the room a buzz. Chantelle is lit with the Lupolux from the left of camera and a bit of light coming from a window to the right. The Lupo has a colour temperature of 5600k (sunlight at noon) and the light coming through the North facing window has a colour temperature of about 8000k as it is coming from a blue sky with the odd cloud. You can see the variance between the sources on the right side of the duvet.

Chantelle-Hole-05

05. I used the classic key and backlight technique that utilises just one light and a mirror for this and the next set of shots.

Chantelle-Hole-06

06. In black and white this set look like stills from an old movie. I love this timeless quality that can only come from a light with a Fresnel lens like the Lupolux spotlights.

Chantelle-Hole-07

07. I taught high key and low key shooting. For High key images like these I like to keep the frame simple and uncluttered.

Chantelle-Hole-08

08. Adding design to the imagery is important when shooting in one hotel room for a complete session. The trick is do some research, make up moodboards and never run out of ideas.

Chantelle-Hole-09

09. These images and the ones below right down to set 14 were lit with the Lupolux 1000 and a Scattergel. I couldn’t have taken these shots with a Speedlight or with any flash system. With continuous light you get to see exactly where the light is going and how much of it there is.

Chantelle-Hole-10

10. The hard shadow under Chantelle’s chin and her well defined cheekbones are clues to the hard lighting style used.

Chantelle-Hole-11

11. I shoot into the light, with the light and at 90 degrees to the light to mix up the shots.

Chantelle-Hole-12

12. The Scattergel really makes these images timeless. They could have been taken in any of the past six decades. (Calvin Klein logos excepted)

Chantelle-Hole-13

13. Most of my boudoir work gets printed in black and white as it simplifies the shots however when the colour element in a shot is exciting I like to keep it in colour.

Chantelle-Hole-14

14. Close ups and detail shots make album layouts more exciting. Boudoir is definitely a genre that favours albums.

Chantelle-Hole-15

15. In the background of the left shot you can see the Roman blind. These are less useful than curtains but they can still be used to make night scenes in the daytime.

Chantelle-Hole-16

16. A little bit of Hollywood glamour emphasising Chantelle’s cheekbones was a must for this shoot.

Chantelle-Hole-17

17. The paneling in the room makes it look interesting and gives a grid to help get the verticals upright.

Chantelle-Hole-18

18. These two shots and the ones in the panel below were lit using window light.

Chantelle-Hole-19

19. The Fuji X series cameras are so easy to shoot with. The technical quality of the images is a given. The lenses are spot on wide open too. My client shot on a Canon 5D mk3 and there were times that it struggled to keep up with the little Fujis.

Chantelle-Hole-20

20. These shots were taken on my Fuji X100t It is a joy to work with and near silent too. The X100t is my desert island camera. If I could only have one camera and one lens the X100t would be it. I feel so creative with it in my hands.

Chantelle-Hole-21

21. Here’s another frame shot with the wonderful Fuji X100t. I said at the top of this post that I’d discuss the 1/2 CTO gel so here goes. We set up this shot in the middle of the day, the Roman blinds although good didn’t keep out all the blue light. The walls are a blue/green Farrow & Ball type flat matte paint. I set the camera white balance to 3800 Kelvin and the table lamp must be about 2800-3000k hence the wall colour above the lamp being orange. I then put a 1/2 CTO (colour temperature orange) gel on my Lupolux 1000 LED that has a core white balance of 5600k so that made it about 4500k and slightly blue in the frame. You can see the blue from my light on the bed sheets. I then warmed up Chantelle’s skin tone with a brush loaded with a white balance shift in Lightroom. This gave me the moonlight and tungsten light mix that you see here. Easy really once you know how.

Please feel free to comment on these pictures below.

Chantelle is the model for my one off fashion and boudoir workshop event on the 8th June 2015 in the Cotswolds. It will be a spectacular day at a sumptuous location. Take a look here for all the details and to book your place.

This post has been read 2,711 times.

The post Chantelle Hole dans le boudoir appeared first on ProPhotoNut.

Lighting demo with Fuji X at Wilkinson Cameras

$
0
0

On Friday I was in Liverpool to give two half day lighting demonstrations to the customers of Wilkinson Cameras. I divided the sessions into Hollywood style lighting using the Lupolux continuous lighting and working the Fuji X cameras with flash systems from Cactus and Elinchrom.

01. Hand held shots taken using my Fuji X-T1 or Fuji XPro1 and the 35mm lens at f/1.4 I used just 1 Lupolux LED 650 spotlights to light these too.

01. Hand held shots taken using my Fuji X-T1 or Fuji XPro1 and the 35mm lens at f/1.4 I used just 1 Lupolux LED 650 spotlight to light these too.

Here are a few more of the pictures I shot of the lovely Natasha Beardmore

02.

02. A Scattergel was used on the Lupolux to light the shot on the left.

03.

03. I used my travel Venetian blind kit to create the shadow on this set of shots.

04.

04. After the break I showed a series of one light set ups using flash. These were variations with a single 130×50 striplight soft box.

05.

05. This shot was opened up by 4 stops to show how my X-T1 handles dynamic range and why I don’t expose to the left.

06.

06. These one light shots were all taken with my striplight softbox on an Elinchrom ELB Ranger Quadra.

If you live in the North of England missed this event come to the Digital Splash event in October. I’ll be there, will you?

My thanks go to Richard Wan of Fujifilm UK for hosting me in Liverpool and subsidising the event for you guys. It’s great to be associated with such a kind and forward thinking team that is Fujifilm.

Thank you Wilkinson Cameras for your help and support. Wilkinson Cameras are a very impressive retail operation with trained, knowledgeable, courteous staff. Just like the good old days. The sort of shop that builds loyalty and cares about it’s customers.

This post has been read 1,682 times.

The post Lighting demo with Fuji X at Wilkinson Cameras appeared first on ProPhotoNut.

1 to 1 ~ foundations of studio lighting – pictures

$
0
0
1. One light is often all you need to make great studio portraits. All the shots in this series were taken with one or two studio lights.

01. One light is often all you need to make great studio portraits. All the shots in this grid were taken with just one light. Incidentally I love my Chinese fighter pilots helmet. What a great addition to my props store.

In this series of shots I show how applying knowledge to lighting can result in very marketable portraits for both the social and corporate markets. It’s not how many lights you have in the studio that matters, it’s what you can do with them that counts. Here are 26 frames from a recent 1:1 session that show what can be achieved with just one or two lights, enjoy…

Model: Victoria L Coutts
Makeup and hair: Vicki Waghorn
Camera: Fujifilm X-T1
Lenses: 35mm f/1.4 and 56mm f/1.2

02. Adding a second light to the mix is great at providing some separation from the background.

02. Adding a second light to the mix is great at providing some separation from the background. With the right control the key light can also become the background light and any spill can be reflected back in to control contrast.

03. A single light was used here to create this ethereal look.

03. A single light was used here to create this ethereal look. The shot looks like it used many lights but it was the work of a single Elinchrom 500Ws Studio head and a reflector.

04.

04. This one light sequence is perhaps a bit more obvious but there is still some control of contrast and tone to be had at the taking stage.

05. I specialise in teaching upstage lighting for effect. It generates siple yet striking images that can be used for dramatic effect as well as pregnancy photography.

05. I specialise in teaching upstage lighting for effect. It generates simple yet striking images that can be used for dramatic portraits as well as pregnancy photography.

06. A one light, one wall moment.

06. One light, one wall moments. In my sessions I teach how to control shadows and separate tones.

07, In camera diffusion is one of the tricks used last century and it can still be used for great effect now.

07. In camera diffusion is one of the tricks used last century on film that we can still use today for a great look.

08.

08. Sometimes you just ‘see’ the light and want to capture it however it presents itself. The shot on the left was lit with just the modeling light in the flash head. The shot on the right involved one head and a reflector.

09.

09. These shots were lit with a single Lupolux spotlight aimed through my make shift Venetian blind. I pushed the exposure several stops on my Fuji X-T1 knowing I’d have complete control of the raw file. These are the kind of exposure control skills I teach on my 1:1 sessions.

Even when I’m restricting the studio lighting session to one or two lights I get very advanced quickly. My delegates always keep up because the fundamental information and secrets that I share are very easy to follow. Once you have the knowledge these kinds of images are easy to recreate. My job is to empower you with that knowledge and the skills you need to take your studio photography to a much higher level.

10.

10. These frames were lit with one Lupolux LED spotlight. It really doesn’t matter what gear you have I can show you how to get the most from it. My studio 1:1 sessions can happen in my studio in Somerset UK or in a studio of your choice. Ring Blaise or Laura on +44(0)1275 853204 or email them for prices, my availability and information. You’ll be surprised at just how much you can learn in a short period of time and just how cost effective a 1:1 session can be.

Feel free to comment below.


This post has been read 1,442 times.

The post 1 to 1 ~ foundations of studio lighting – pictures appeared first on ProPhotoNut.


Chantelle Hole ~ In and out of fashion

$
0
0
01.

01. A single Lupolux LED 1000 created all the drama needed for this simple shot of Chantelle. See how the crisp hard Lupolux light defines Chantelle’s cheek bones. This kind of simple styling is perfect for perfume adverts. There is even room bottom right for a bottle shot. I used a 125mm setting and f/2.8 on the XF 50-140 f/2.8 zoom lens.

Chantelle and I are off to the South of France on Wednesday for our sell out workshops. Here are a few frames of Chantelle Hole from my last UK workshop held at Manor By The Lake near Cheltenham last month. As you can see variety was the order of the day.

02.

02. A soft lighter character has been captured by shooting from above Chantelle’s eyeline. The Lupolux really came into it’s own as a key light for these dynamic beauty shots. The 56mm f/1.2 really comes into it’s own when shooting interior beauty portraits like these.

03.

03. The colours generated by the latest generation of Lupolux LED lights captured by the Fuji X-T1 with the 56mm lens are sublime straight out of the box.

04.

04. There’s always room for fun on a Lovegrove shoot. Generating a playful atmosphere is vital to my style. I swapped to the X100T with it’s 23mm lens for the pillow fight shot. I find the small lightweight X100T is a perfect camera for the fun moments in my shoots without compromising the image quality even wide open at f/2.  The X100S & T cameras are super sharp and equipped with the same  sensors as their big brother The X-T1.

05.

05. The mirror shot at the top is lit with the Lupolux, so too is the elaborate bed shot. The bath shots are natural window light and captured with the wonderful XF 16mm f/1.4 lens.

06.

06. The party room at the Manor By The Lake is perfect for wedding guests to enjoy late into the night.

07.

07. The white bench shot is lit with sunlight from behind and a single Elinchrom Quadra ELB Action head with it’s simple diffuser. The shot at the bottom left is lit by glancing sunlight and the bottom right shot is lit with reflected sunlight from a Sunbounce Pro silver reflector.

09.

08. The Elinchrom came out for the shots top and left and the bottom right shot was lit with the Sunbounce Pro. I’m really getting to grips with the new 50-140mm zoom lens for my outdoor work. It’s a stunning optic and one that fills me with confidence when I use it.

We covered quite a lot of ground on this final workshop, mixing styles and genres. There were lighting decisions to be made throughout the shoot even when we were working with just ambient light.

Please feel free to comment below. If you want to join me on one of my overseas photography events please take a look here. You will find plenty of workshops and photographic holidays from 1 day events to 12 day tours.

This post has been read 851 times.

The post Chantelle Hole ~ In and out of fashion appeared first on ProPhotoNut.

Scattergels – pictures and inspiration

$
0
0

A lighting style defined by a £40 accessory

It was just under three years ago that I decided to create a set of gobo (go between) filter gels. I wanted to utilise the clips on the barn doors of the then new Lupolux LED spotlights. Luke and I set to work and between us we created the Lovegrove ScatterGel™ collection.

01.

01. I usually just use one light with a Scattergel to create my looks. The shot top left however has three lights, two of them with Scattergels.

Here are my favourite shots taken with Scattergels. They are all taken using Fuji X cameras. In this post I share and the tips and tricks needed to get the most from these fabulous light modifiers.

02.

02. Scattergels are designed for use with spotlights with fresnel lenses. They need a point source of light to project the pattern on the subject. They are not compatible with flash systems because the light source in a flash unit is shaped like a horse shoe or doughnut. The two tungsten lights shown in the photograph top left are the Arri 300 Junior and the Arri 150 Junior. These are the most powerful hot lights that can be used with Scattergels and only if they are used briefly for a minute or two at the most. Scattergels work best with the LED and HMI range of luminaires from Lupolux.

03.

03. Here are the 5 designs that Luke and I came up with. Some are more subtle than others and each luminaire/ Scattergel will have it’s own characteristic look. Some lamps like the Lupolux LED 1000 have a larger light source and deliver a more diffused calmer look than let’s say the Lupolux HMI 800.

04.

04. Sometimes I use an ‘Alto’ Scattergel to add a dappled effect on a plain studio background.

05.

05. They work well when lighting the background and your subject with the same light. By rotating the barn doors slightly it is easy to align the clear parts of the pattern with your subject’s position. It is this process that is almost impossible when using a Speedlight or another light source without a modelling light.

06.

06. One light magic on the top shot and Chantelle in the bath. For the Film Noir shot of Chloe-Jasmine at the bottom left I used a Lupolux 650 as a back light too. The key light was a Lupolux 1000 with a ‘Crunch’ Scattergel.

07.

07. A thoroughly modern twist on boudoir uses a single Lupolux LED spotlight and an Alto Scattergel. You can add a 1/2 CTO gel too to reduce the colour temperature as I have done here. The next generation of Lupolux LED spotlights due to be released in July 2015 have an adjustable colour temperature control built in. How cool is that!

08.

08. Each Lupolux LED spotlight has a built in dimmer and the colour temperature remains constant throughout the range of adjustment. I use the dimmer in conjunction with the ISO/ exposure on the camera to control scene contrast.

09.

09. Low key works well too when using the Scattergel and Lupolux LED spotlight combination.

10.

10. I like to be brave with design and shape. I rarely let shadows disappear into blackness but occasionally it can work quite well.

11.

11. High key works well too. I used a Lupolux LED 1000 to capture this fun scene with top international model Wlada Schuler. I left the house lights on in this studio in Munich to keep the contrast manageable.

12.

12. There are so many subtle uses for Scattergels that just add that bit of magic to a simple scene.

13.

13. It’s easy to see how a lighting style can be so well defined using simple Gobos like Scattergels.

Scattergels are available here, the Lupolux 1000 spotlights are here and the great value 650 spotlights are here. From time to time there are great deals on lights or gels. We notify our customers with discount codes in our occasional newsletter. Feel free to comment below.

This post has been read 1,319 times.

The post Scattergels – pictures and inspiration appeared first on ProPhotoNut.

Amber Tutton ~ Fuji X-T10

$
0
0
01.

01. The colour pallette on the Fuji X-T10 is sublime. Delicate brilliance straight out of the camera.

Here are 28 photographs taken with the new Fuji X-T10 at the Amateur Photographer reader day event in London with Fujifilm UK

I was asked by Fujifilm to inspire, educate and demonstrate to a group of 60 AP readers how I use the Fuji X series cameras and in particular to share my strategies for switching from a DSLR. I started the day with a mini seminar and a demo to the whole group. After lunch the group was split and my colleagues and fellow X photographers Matt Hart and Paul Sanders worked with their groups respectively. Each hour or so the groups swapped around to enable each photographer to spend some really valuable time with the three of us. 02. These frames were lit with a pair of Arri lights and some controlled daylight.

02. These frames were lit with a pair of Arri lights and some controlled daylight in the auditorium at the start of the day.

Each attendee had won a competition to spend the day with Fujifilm and the Time.inc team, publishers of AP at their HQ, the Blue Fin Building. The buzz was fabulous, the venue striking and the hospitality generous. I feel privileged to be involved with both Fujifilm UK and Amateur Photographer magazine. Look out for my Hollywood lighting feature in AP in August 2015 ;)

03. For the afternoon practical sessions I used my trusty Lupolux Dayled 1000 spotlight and a Scattergel. This light was powered by a battery to avoid the need to run extension cables.

03. For the afternoon practical sessions I used my trusty Lupolux Dayled 1000 spotlight and a Scattergel. This light was powered by a battery to avoid the need to run extension cables. The LED powered 1000 spotlight can run for well over two hours on one compact Li-Ion battery. 23mm lens at f/2.8

Model: Amber Tutton
Hair and Makeup: Amber Tutton
Wig supplier: Annabelle’s Wigs
Camera: Fujifilm X-T10
Lenses: XF 23mm f/1.4 and XF 35mm f/1.4

04. I showed various techniques to shoot fashionable portraits with just one continuous light.

04. I showed various techniques to shoot fashionable portraits with just one continuous light. XF 23mm lens at f/2

05. The X-T10 handles superbly when it is set up well. Each of the functions and buttons need assigning  assigning and the

05. Amber Tutton is a fabulous model. kind and patient too. Thank you Amber for your professionalism.

The X-T10 handles superbly when it is set up well. Each of the function buttons need assigning and the user interface menu options need careful setting. I’ll be covering how to make the X-T10 a joy to use when I get back from my trip to Rome this weekend. I’m now at over 3000 frames with the X-T10 and I love it.

06. Hard light is my light of choice.

06. The Blue Fin Building in Southwark is a blend of contemporary design and materials. Literally every space has a picture opportunity. XF 35mm lens at f/1.4

07. Amber had a few different looks to share with us.

07. Amber had a few different looks to share with us. These frames were shot with my XF 23mm lens at f/1.4

08.

08. The Fuji XF 35mm lens is rapidly gaining legendary status. It’s great at f/1.4 for intimate portraits with a wonderfully controlled bokeh. All the Fuji XF lenses are amazingly sharp wide open and that’s where I like to use them for the majority of my work.

09.

09. I showed how to bleach the background with increased exposure while maintaining the image integrity.

10.

10. A bit of fun at 1/1000 second using window light. Fuji X-T10 with the XF 35mm lens at f/1.4

Thank you Time.inc, Amateur Photographer, Fujifilm UK and Amber Tutton. Let’s do this again sometime soon.

Please feel free to leave a comment below.

This post has been read 20 times.

The post Amber Tutton ~ Fuji X-T10 appeared first on ProPhotoNut.

Fuji X-T10 ~ A mini marvel – My first 80 portraits

$
0
0

Ooh La La

My first workshops in France for over 10 years got off to an amazing start. The Fuji X-T10 arrived the day before we left and that gave me the time needed to set it up just how I wanted (or so I thought). I’d spent a couple of hours working out how I was going to set the ISO without a top plate dial and how I was going to trim my exposure to 1/3 stop increments. I thought I had it sussed then I started shooting for real in France. It was only when I had shot with the big zoom, the small primes, in the dark and with flash that I had gathered enough experience to make the final changes to my X-T10 set up. All will be revealed below. Every shot I took in France was with the X-T10 camera (in silver).

Locations: La Romieu and environs in the Gers region of France
Models: Chantelle Hole and a guest appearance by Maxime Paquet
Location Scout: Simon Whitten
Event coordinators: Laura Haskins and Blaise Parsons at Lovegrove
Styling: Dresses by Molly Mishi May and Lisa Keating
Camera: Fujifilm X-T10 with 16mm, 23mm, 35mm, 56mm and 50-140mm lenses.

01.

01. It was hot, around 36° as expected for mid July and the shady places in the sun drenched back streets of La Romieu made perfect shoot locations. I love simple compositions like these that utilise the primary colours of light and pigment. These three photographs were all shot with my favourite lens the XF16mm.

I was in France to lead a portraiture and fashion workshop event over three days. We had delegates from Oklahoma in the US, Switzerland, Holland, Belgium, Surrey and Bristol. The group gelled really well and it’s fair to say we have all made new friends. Here are 80 or so portraits from our three days in paradise. Enjoy

02.

02. The beautiful towns in the South of France have seen little change in their layout over recent years with many of the Medieval structures still in good repair. There is a charm and quaintness in the back streets that reminds me of Tuscany.

03.

03. The harsh midday sun reveals wonderful texture in the architecture while the hat I bought at a market in Rimini came to good use too in France. These two shots were taken with the XF23mm lens for a more natural perspective.

04.

04. The delicate curve on these stairs, the colour of the woodwork and the small details like channelled in drainpipes blend well with a shabby chic patina. I took these background shots with the X-T10 on the recce day I had with Simon ahead of the workshop. It was important for me to see the play of light on the buildings and to get used to the new X-T10 camera that I was using for the first time.

The X-T10 camera behaved really well however I kept accidentally pressing the ‘Fn’ button with the palm of my hand so I reassigned the button by pressing it for 3 seconds and selecting ‘none’ from the drop down list of options. That left me without a function button for ‘WIFI’ but I can live with that in the main menu system.

05.

05. I used a single Cactus RF60 to light Maxime and triggered it with a Cactus V6 transceiver. This is by far the best set up I’ve used for the Fuji system to date and it worked fine on the delegates’ Canon, Nikon and Sony cameras too. We started by setting the ambient exposure and added flash to taste. These flash shots were taken with the XF35mm lens at f/8.

I programmed the video function button on the top plate of the X-T10 camera to toggle ‘Exposure preview in manual mode’ on and off. This makes it fast to switch viewing modes to ‘on’ when I’m working with natural light and ‘off’ when flash is the dominant light source.

06.

06. I showed how to shoot street portraits with modelling in the bright overcast lighting conditions that prevailed for the first hour or so of day three. All of these shots were taken with the stellar 50-140mm lens. You might imagine that lens on the X-T10 would be awkward to use but in reality it is fine. I just hold the lens in the left hand and the camera hangs on the back. I really enjoyed using this combination. Look at the bokehlicious shots in panels 31 and 32 below for more 50-140mm examples.

I set the front control wheel of my X-T10 to ISO and set the shutter speed dial to the ‘T’ position. This gives me control of the aperture on the lens ring, control of shutter speed in 1/3rd stop increments on the rear control wheel and full control of ISO in 1/3rd stop increments on the front control wheel. This means that all parameters can be changed in a jiffy. It’s just like using an SLR again. In the late 1990s camera makers changed from old fashioned top plate dials to new style control wheels with LCD menus and we took the time to learn new motor skills but it was worth it. The cool retro look of the Fuji X cameras initially limited usability to a pre 1990s level, but now with the two control wheels on the X-T10 and X-T1 cameras, SLR users can use the new Fuji X cameras in familiar ways. There really has never been a better time to make the change.

07.

07. There is always time for a bit of fun on one of these Lovegrove photography events.

08.

08. Maxime is the son of one of the delegates and I persuaded him to model for us on the creative day. He is a great footballer so I expect him to replace Ronaldo at some point soon. The centre shot has carefully controlled rim light and I pushed the exposure for the shot on the right to burn out the buildings in the distant background. The shot on the left was taken with the XF56mm and the shots centre and right were taken with the XF50-140mm lens.

09.

09. Chantelle and Maxime were game for a few natural light and flash pictures together. The simple use of an off camera Speedlight really added some punch to the shot on the right.

10.

10. The tones produced by the Fuji X-T10 are sublime straight out of the camera.

11.

11. I showed the delegates how I work foreground and background into couple shots. X-T10 with XF35mm lens at f/6.4

12.

12. XF35mm at f/4

13.

13. XF35mm at f/4

14.

14. I love the colours and textures that prevail in the South of France.

15.

15. “Push, push, push the exposure until the camera screams at you and then knock it back a click” was my direction to the delegates. That’s what I did for the sun drenched shot of Chantelle on the left. Being able to see the exposure in real time before pressing the shutter is a key benefit of the Fuji X system over an SLR as it takes all the guess work out of the process.

16.

16. One more frame for the ‘Girls In Hedges’ series that I’m shooting that may or may not make a collage or book at some point.

17.

17. We negotiated our way into the abbey cloisters and chapel to shoot a few frames for an hour at the start of day one. This gave all of us the opportunity to get set up and shooting. Shots on the left were taken with the 50-140mm lens and the one on the right was with my XF16mm lens.

18.

18. The sunlight coming through the stained glass gave a distinct Lupolux with Scattergel type look to these portraits even though these were all shot with natural light.

19.

19. Location two on day one was Galerie Va Bene set in an ancient house with medieval ruins. This dress by Molly Mishi May was a perfect match or the tones and textures in this stunning location. I used the XF50-140mm lens for the shots on the left and the XF23mm for the contemporary fashion shot on the right.

20.

20. I lit Chantelle with a Lupolux LED 1000 for these shots. I powered the light from this Li-ion battery inverter.

21.

21. The art gallery was a special place to shoot as it gave us a wide range of lighting challenges overcome with our Lupolux 1000 LED spotlight.

22.

22. The shot on the right of Chantelle in another creation by Molly Mishi May was lit with a hand held reflector at about 15m from the subject.

23.

23. Day two started at Château de Lisse. I used a pair of Cactus RF60 Speedlights to light Chantelle. The key to success for this kind of shot is to get the balance of subject and background right. This is unmistakably a shot of Chantelle and the chateau in the background is an accessory in the shot. I used the XF35mm at f/16.

24.

24. The chateau interiors were perfect to show off this corseted dress by Lisa Keating. I used the Lupolux LED 1000 sparingly with the Scattergel on some of these shots taken with the wonderful XF23mm lens.

25.

25. These three shots were all taken with the 56mm lens with the shot bottom right being taken at f/1.2 with 1/40th second at ISO 400 using a monopod.

26.

26. The extensive interiors at Château de Lisse offer days of shooting opportunity however we had the wonderful French countryside to explore so our time spent inside was kept in check. The shot top left with Chantelle at the piano was shot on the XF56mm lens and lit with the Lupolux  LED 1000. The other three shots were taken with the XF23mm lens and lit with finely controlled window light.

27.

27. The chateau is in splendid condition and has many exciting details to shoot from romantic rooms in turrets to suits of armour. I didn’t ask Chantelle to put on the armour as I’m sure the idea wouldn’t have been well received.

28.

28. A stroll in the noon day sun to test the AF tracking on our cameras. This location was particularly challenging but if it was easy everyone would do it.

29.

29. Things hotted up when we went to the gently rolling corn fields. The morning haze had burned off and the temperatures were soaring to 38° in the shade. Out here there was no shade so this became the physical challenge to overcome for Chantelle and the photographers alike. I love the way blue skies are rendered in black and white. The shot at the top was taken with the XF23mm at f/1.4 and the one at the bottom was taken with the XF50-140mm lens at f/5.6.

I could see the EVF of the X-T10 quite clearly even in this intensely bright light. I did find myself shielding my eyes from stray sunlight from time to time so I’m sure a deep eyecup accessory like the one Fuji make for the X-T1 will be welcome.

30.

30. I particularly love these two shots of Chantelle. The top one was taken with the soon to be classic XF50-140mm lens at f/4 and the one at the bottom was taken with the 23mm lens at f/1.4. I used an ND64 (6 stops) to get me from f/11 down to f/1.4 whilst maintaining my flash sync speed of 1/180th second). I lit Chantelle in the bottom picture with the Elinchrom Quadra kit. This is the Quadra kit I recommend.

31.

31. The shot on the left of this woodland scene was taken with the XF16mm at f/4 while the shots on the right were taken with my bokehlicious 50-140mm lens at f/2.8.

32.

32. The bokeh on the XF50mm – 140mm is a work of art. The delicate grasses are rendered in the most pleasing way. The punchy highlights aren’t the hard edged spots that I’m used to from my SLR 70-200mm lenses and at f/2.8 on APSC I can get the same depth of field as I could at f/4 on full frame meaning from the tip of Chantelle’s nose to the back of her hair is perfectly sharp while the background is beautifully rendered out of focus.

33.

33. Rural France has lots of little abandoned farm cottages to explore. The shot on the right of Chantelle in the doorway was shot with the XF56mm at f/1.2 through the bushes to give the dreamy look.

34.

34. I used a similar technique as in the shot above for these shots too.

35.

35. The cottage was small inside so I used the XF16mm to create the shot on the left and the 56mm lens at f/1.2 for the shot on the right. I wanted the bottle to be delicately blurred.

36.

36. The South of France is known for fields of sunflowers so no shoot here would have been complete without a shot or two.

37.

37. The last setting for the final day was a wonderful field of straw bales. The top frame was with Velvia simulation and the bottom frame was with Pro neg S film simulation.

How much fun was that? We all got on so well we are planning to be in Tuscany next September for a follow up event. If you would like to take part on a Lovegrove 3 day shoot event email Laura and she will ensure you get kept informed with what’s coming up.

I’ll blog my X-T10 settings and usage guide just after my travel blog post from Rome. I shot Rome earlier this week exclusively with the X-T10 again but this time with the compact zooms, the 18-55 and the 55-200. Both of these lenses are super sharp and have OIS. That combination makes them perfect for travel. My Rome blog is up next.

Please feel free to comment on these shots or your first experience with the Fuji X-T10 below.

This post has been read 6,199 times.

The post Fuji X-T10 ~ A mini marvel – My first 80 portraits appeared first on ProPhotoNut.

Hollywood Glamour in Dusseldorf

$
0
0
01.

01. My hotel suite was perfect for this shoot. I’m lucky to have Blaise and Laura at my studio because they are great at sourcing amazing venues to shoot in. If you have a 1:1 or 1:2 training session with me you can leave the location scouting to them.

The scene was set at the fabulous Stage 47 hotel. The lighting was with a Lupolux Led spotlight kit comprising a 1000, a 650, scattergels and stands. Our model and makeup were arranged by my clients and I was commissioned to deliver a 1:2 workshop/ shoot experience based on Hollywood Glamour. Here are 25 pictures from the day

My clients had secured the services of professional model Rina Bambina and hairstyling with makeup was by Britta Carina Wownenko at Wow-Make-up.

02. Props included this wonderful vintage Leica.

02. Props included this wonderful vintage Leica. I used the Fuji XF90mm lens for these shots and it’s surprising how close it focusses.

03.

03. I added a hair light from the Lupo 650 and the pictures came alive.

I shot all day with my new favourite camera the Fuji X-T10 with 16mm, 23mm, 35mm, 56mm and 90mm lenses. My clients shot with Fuji X-T1, Rolleiflex twin lens reflex and a medium format Pentax 645z. The advantage of working 1:1 or 1:2 is we can go at a pace to suit film or medium format shooters.

04. Probably the shot of the day was this moment created with a burst of energy on my part to trigger Rina's reaction. The 90mm lens by Fuji really does deliver. I was skeptical about shooting handheld with it as it doesn't have OIS but I was getting away with shutter speeds as low as 1/125th second. I'll do more testing next week when I'm back in the UK.

04. This is probably the stand out shot of the day. It was a moment created with a burst of energy on my part to trigger Rina’s reaction. The 90mm lens by Fuji really does deliver. I was skeptical about shooting handheld interiors with it as it doesn’t have OIS but I was getting away with shutter speeds as low as 1/125th second. I’ll do more testing next week when I’m back in the UK.

Other kit included Tiffen Black Pro Mist filters in 1/4 strength and a monopod for the Pentax. Everything here was shot on the Fuji X-T10 hand held.

05. Very Edward Hopper in styling and colour palette.

05. Very Edward Hopper in styling and colour palette.

06. I used the Tiffen pro mist filter on the 90mm lens and at times I doubled up the filters to see just how far you can go and make it look fabulous. All the looks in my images are created in-camera.

06. I used the Tiffen black pro mist filter on the 90mm lens and at times I doubled up the filters to see just how far you can go and make it look fabulous. All the looks in my images are created in-camera. I don’t use sudo film presets in Lightroom as optical diffusion is just so much better and less uniform.

07. The 90mm lens gets right in there

07. The 90mm lens gets right in there. These shots were cropped like this in-camera. The calmness of the shot on the right was mesmerising when I saw it full screen at the edit.

08. We were off to lunch at a nearby bistro and I grabbed this shot of Rina while we were waiting for the lift. ISO 4000 is fine on the X-T10 :)

08. We were off to lunch at a nearby bistro and I grabbed this shot of Rina while we were waiting for the lift. ISO 4000 is fine on the X-T10 :)

09. The staircase at the hotel was a wonderful location to shoot in.

09. The staircase at the hotel was a wonderful location to shoot in with a pair of Lupolux spotlights. The light rigged on the half landing was battery powered to avoid trailing cables. The 1000 can run for over two hours on full power from a V-mount battery kit costing about £200. Ask Blaise or Laura for details on the new battery solutions for Lupolux spotlights. They are on (044)1275 853204

10. We had time at the end of the day to do some boudoir with classic lighting.

10. We had time at the end of the day to do some tasteful boudoir with classic lighting. Emotion and connection is everything with this genre.

12.

12. We just used one Lupo 1000 up on the mezzanine bedroom level.

13.

13. A Lovegrove classic shot with a pair of Lupos with classy elegance provided by Rina.

1:1, 1:2 and small group training is where It’s at now. Bespoke sessions tailored to your needs, at a pace you can enjoy with bags of learning to be had on every level of the process. More information on 1:1 and small group training and shoots can be found here.

I’d like to thank Tom Klein and Michael Günther for booking me in Dusseldorf. Where are you going to have your shoot session? Cuba? I wish :) Please comment below and feel free to ask questions in the blog comment section at the foot of the page. I reply to each and every blog comment and I try to respond to all the Facebook comments too.

This post has been read 444 times.

The post Hollywood Glamour in Dusseldorf appeared first on ProPhotoNut.

Lupo add dual colour spotlights to their range.

Powering studio flash on location ~ A perfect solution

$
0
0

Godox LP-800x Pure Sine wave Inverter

If you have studio flash heads and want to use them on location this amazing new power supply will fuel your creativity when on the road. It’s new tech like this that changes the face of photography and opens up opportunities that were once the reserve of high budget commercial shooters.

For the price of a lens you can now make the world your studio. Click here for pricing and further information for the Godox LP-800x, powering studio flash on location.

This post has been read 73 times.

The post Powering studio flash on location ~ A perfect solution appeared first on ProPhotoNut.


Boudoir in Rotterdam ~ Rosalinde Kikstra

$
0
0
01.

01. If a room has a plain wall it can be used as a mini studio. For this striking shot of Rosalinde I closed the curtains and put a Scattergel on a Lupo 650 spotlight. I used the one light to light Rosalinde, the wall and the floor. It’s rare for me to use side lighting for eye contact pictures but it adds a tension to this shot and I like that.

In this post I share 27 shots from the recent workshop I ran at the fabulous Pincoffs Suite Hotel on the waterfront in Rotterdam. Enjoy..

Model: Rosalinde Kikstra
Location: The Romantic Suite at Pincoffs Suite Hotel in Rotterdam
Lighting: Lupo 1000 and Lupo 650 spotlights
Camera Fuji X-T10, 16mm, 23mm, 35mm, 56mm and 90mm lenses

02.

02.A single Lupo add a certain style to any interior shoot in a way that is quite unique.

We started the session over coffee in the fabulous hotel bar area where we discussed strategies for lighting and shooting. We did a kit check and went up to the sumptuous suite where we were shooting. I like to start boudoir workshops in this informal way so that everyone can get to feel comfortable and get to know each other.

03.

03. At one point in the shoot I noticed sunlight breaking through a gap in the curtains. We opened them but kept the light diffusing ones in place. This created the pattern we worked with.

We mixed colour temperatures, shot high key and low key, and explored the different shooting strategies needed to create a style.

04.

04. This shot in the bathroom was lit with the Lupo 650 dual colour. I show how this light works in this video.

05.

05. I decided we needed a bit of drama in the shoot so I set up the shower head , aimed it into the bath and passed it to Rosalinde. This was taken on the 16mm prime lens on the Fuji X-T10.

06.

06. I most notable boudoir style has been softer and I showed how to light this style to make it look natural.

07.

07. The shot on the right was lit to look like sunlight coming through the windows.

08.

08. I used a Tiffen Black Pro Mist filter at ¼ strength on these shots to scatter some of the natural highlights.

09.

09. The shots at the bottom were lit with two Lupos. The shot at the top was lit with one Lupo. We worked with the curtains closed for some of the shoot to give a more authentic evening feel.

10.

10. Every now and then I put a Lupo in the shot. 

11.

11. I loved these shells on a string. The seemed so delicate and pearlescent. I used the Lupo 1000 powered by this battery kit to light these.

12.

12. A few more striking shots of Rosalinde

13.

13. This is as low key as it gets.  I’ve bumped the contrast up in Lightroom but there are many more processing look options.

At the time of writing there are still a couple of places on my boudoir workshop next month in Copenhagen. All the details for that event are on this page.

Feel free to comment on these pictures below :)

This post has been read 1,173 times.

The post Boudoir in Rotterdam ~ Rosalinde Kikstra appeared first on ProPhotoNut.

An introduction to Scattergels

How to ~ Hollywood Portraits

$
0
0

Recreating the golden age of Hollywood

by Damien Lovegrove

The classic Hollywood portraits from the golden age of film conjure up visions of fantasy, romance and perfection. These evocative images have always been a style that is in great demand among high society.  Establishments like Studio Harcourt in Paris set up in the 1930s have met this demand and continue to this day.

01. Just one Lupolux LED 650 spotlight was used to create this Marilyn style image.I used a piece of light frost gel attached to the barn doors of the lamp to subtly diffuse the light.

01. Just one Lupolux LED 650 spotlight was used to create this Marilyn style image.I used a piece of light frost gel attached to the barn doors of the lamp to subtly diffuse the light.

In this feature I’m going to share with you the skills, formulas and style traits needed to make up the Hollywood look. I learned how to light the Hollywood way from a retired lighting director when I was undergoing my lighting training at the BBC in the early 1990s.

I’m often asked what makes a portrait ‘Hollywood’ in style? My answer is the finely controlled use of hard light from fresnel spotlights, a narrow depth of field and a high quality monochrome print. Vintage Hollywood also needs appropriate hair, make up and fashion styling to complete the look.

02. I used a single Arri 300 junior for this shot of Lora Brisland. A silk tie was fashioned into a hair band and vintage false eye lashes complete the look.

02. I used a single Arri 300 junior for this shot of Lora Brisland. A silk tie was fashioned into a hair band and vintage false eye lashes complete the look.

This Hollywood system works well on location too and with the right lighting any location can look like a film set. A unique characteristic that makes Hollywood lighting so special is the use of traditional spotlights with fresnel lenses and barn doors. These luminaries produce a crisp hard light that is controllable using a flood/ spot system and by the shaping of the barn doors. The look needs Fresnel lens lights for authenticity and it’s easy to spot the classic lighting style of the past masters when lit with these luminaries. Five years ago LED Fresnel spotlights weren’t even dreamed of. Now they have largely replaced HMI and the hot tungsten lights of old. The Lupolux LED spotlights are now available with bi colour LEDs so they have an adjustable colour temperature from 3200k to 5600k. The LED revolution is exciting for stills photographers because we can tap into the kind of lighting that was once the reserve of film crews with mega budgets.

This picture of Lora Brisland exhibits the dreamy qualities that come from using a shallow depth of field combined with a Tiffen Black Pro Mist Filter. The key to this shots success is the intensity of our interaction.

03. This picture of Lora Brisland exhibits the dreamy qualities that come from using a shallow depth of field combined with a Tiffen Black Pro Mist Filter. The key to this shots success is the intensity of our interaction.

The big problem for Hollywood was to make the three dimensions of life look good in two dimensions. This was achieved be separating the foreground and background using tones. Subjects closer to the camera were and still are lit to a higher contrast than the environment or the set that they are in. Pretty much every shot of an actor in a high budget film or TV drama has a back, rim or kick light. These all give the artist a presence in the scene and separate them from the background. Landscape and portrait painters use the same trick. The most distant parts of the scene have the lowest contrast and black is represented as grey.

A subtle tweak to the styling and this shot is bang up to date. The key light is a Lupolux LED 650 and the backlight is another Lupolux LED 650.

04. A subtle tweak to the styling and this shot is bang up to date. The key light is a Lupolux LED 650 and the backlight is another Lupolux LED 650.

The steepness of a key light is determined by the set of the sitters eyes. Deep set eyes or ones with false eyelashes need a shallower key light. This ensures a lovely highlight in the eyes. Shallow set eyes can get away with high, steep key lights and still get a highlight. The steeper the light the more chiselled the face becomes with clearly defined cheek bones and jaw lines. So rig your key light as high as you can and still get a highlight in each eye.

Just a pair of curtains as a background and a pair of Lupolux LED 650s give Carla Monaco that classic film star look. Note the vintage neck line to her dress and the curls in her hair. Carla’s cheekbone is emphasised with a strong shadow created by using a ‘down the nose’ key light.

05. Just a pair of curtains as a background and a pair of Lupolux LED 650s give Carla Monaco that classic film star look. Note the vintage neck line to her dress and the curls in her hair. Carla’s cheekbone is emphasised with a strong shadow created by using a ‘down the nose’ key light.

Shadows are your friend. Shadows reveal shape and the crispness of a shadow edge is determined by the relative size of the light source. The depth of the shadow, the umbra, how dark it is relative to the lit part is the shadow contrast. I like to create dark shadows that still have significant detail. The quality of the final print will be governed by the control of the deep shadow detail. Never let it sink into a black hole.

06. I shoot a lot of profile pictures and I particularly like full length shots in profile. Here I used a Lupolux LED 1000 rigged at 90 degrees to the camera and down the nose of Mina Renoir. Mina wears a couture dress by Molly Mishy May.

06. I shoot a lot of profile pictures and I particularly like full length shots in profile. Here I used a Lupolux LED 1000 rigged at 90 degrees to the camera and down the nose of Mina Renoir. Mina wears a couture dress by Molly Mishy May.

A medium telephoto or a standard lens is best for these kind of shots. For the big wide scene that I shot in Bristol Museum at night [Lovegrove in Hollywood 14] I used the moderately wide 23mm lens on my Fuji X-T1 set to f/1.4 and that equates to a 35mm lens on the full frame SLR format. The trick is not to get too close. If you are more than touching distance from your subject you’ll be okay.

07. Helen Diaz is looking every bit the Hollywood siren in this shot. Notice the cheek triangle of light. This occurs when the nose shadow touches the cheek shadow to enclose a triangle of light. The trick for the Hollywood look is to always shoot into the unlit side of the face.

07. Helen Diaz is looking every bit the Hollywood siren in this shot. Notice the cheek triangle of light. This occurs when the nose shadow touches the cheek shadow to enclose a triangle of light. The trick for the Hollywood look is to always shoot into the unlit side of the face.

If I’m shooting a vintage look I pop some Ella Fitzgerald or Etta James on the hifi in the studio. This helps set the mood. The sitter needs to feel amazing for that energy to come through in the photograph.

Notice how hard light narrows Helen’s face. It falls away around the sides giving a more slender look. Soft light by comparison widens faces and flattens texture. The rim lighting for this shot comes from an Arri 150 light on a boom arm. The boom arm allows me to place the stand out of the shot to the right of frame. Claudia, my make up and hair artist created Helen’s look with classic hair curls and well defined eyes.

08. Notice how hard light narrows Helen’s face. It falls away around the sides giving a more slender look. Soft light by comparison widens faces and flattens texture. The rim lighting for this shot comes from an Arri 150 light on a boom arm. The boom arm allows me to place the stand out of the shot to the right of frame. Claudia, my make up and hair artist created Helen’s look with classic hair curls and well defined eyes.

Hollywood is not all about the past tough, there is a new genre taking hold among social photographers that fuses classic Hollywood lighting with modern fashion styles. The crisp light from these spotlights closely resembles natural sunlight and makes skin come alive. Hard light has been rediscovered by advertisers too. On the down side hard light can emphasise skin surface blemishes but that’s what Photoshop is for isn’t it? Crisp, beautiful hard light energises photographs and transforms them to a fantasy level.

09. For this retro film star look I shot Sarah from above the eye line. I set the Arri 300 key light straight down Sarah’s nose line to minimise shadows. The kick light from an Arri 150 gives the picture depth and separation from the out of focus background.

09. For this retro film star look I shot Sarah from above the eye line. I set the Arri 300 key light straight down Sarah’s nose line to minimise shadows. The kick light from an Arri 150 gives the picture depth and separation from the out of focus background.

Here’s how you get the look: Get it right in camera. Don’t rely on post production to achieve magic. Lighting control is the key here so set your camera up first to show exactly what you need to see. Switch the LCD or EVF to black and white and the screen brightness to manual in the middle position. This will give you a great preview of what lighting changes you are making. You can use a tripod too but it isn’t exactly necessary. I find a tripod helps my fine tuning of the shot. It also helps as I shuttle back and forth contrasting and comparing the subtle lighting changes made between shots. I share the images on the back of the camera with my sitter no matter if they are a client, a model or a celebrity. This kind of shoot is a joint venture and often the sitter has changes to suggest to the styling or expression that ultimately make the shot a success.

10. This shot features my Remington typewriter and a Bakerlite phone I bought on Ebay. The exposure was set by the roaring fire. The lighting was then set to correctly expose Chloe-Jasmine in situ. I used an Arri 300 as her key light and the Arri 150 as her back light.

10. This shot features my Remington typewriter and a Bakerlite phone I bought on Ebay. The exposure was set by the roaring fire. The lighting was then set to correctly expose Chloe-Jasmine in situ. I used an Arri 300 as her key light and the Arri 150 as her back light.


11. Helen is lit with a classic two light tungsten set up of the Arri 300 as a key light to the left of the camera and the Arri 150 as a backlight on a boom arm. The bedside light gives the motivation for the back light and sets the base exposure.

11. Helen is lit with a classic two light tungsten set up of the Arri 300 as a key light to the left of the camera and the Arri 150 as a backlight on a boom arm. The bedside light gives the motivation for the back light and sets the base exposure.

5 steps to create the look:

1. Set the mood of the shot with the camera position. Shoot from below the eye line to make someone seem powerful, statuesque, strong and confident. If you want to soften someones look to make appear vulnerable choose a high viewpoint and photograph them from above.

2. Carefully set your key light. Always light from above and aim the key light either ‘straight down the nose’ or just off to one side so that the nose shadow touches the cheek shadow to enclose a ‘Hollywood triangle’. Use the barn doors to control any spill.

3. Add a back light or kicker to make the image three dimensional and to help separate the foreground from the background. Use a reflector in the spill from the key light to control the contrast in the scene. then light the background as required.

4. If you are going for an authentic vintage look make up and hair styles are really important. Curls and lashes take time to get right so allow plenty of prep time for your shoot. I research vintage hair and make up styles using Google images.

5. Get the styling right as this is such a big part of the look too. An evening dress makes a good base. I often add a white shrug that I bought in Top Shop, some pearls I bought at Primark and vintage style sunglasses purchased on Ebay.

12. High key Hollywood lighting is just as beautiful as low key and might just prove more popular with some photographers. Keep the lighting hard and the contrast soft to make this genre work well.

12. High key Hollywood lighting is just as beautiful as low key and might just prove more popular with some photographers. Keep the lighting hard and the contrast soft to make this genre work well.

Kit list:

1. Spotlights with fresnel lenses are best. Fresnel lenses achieve the magnification of a much thicker lens without the weight. The lens rear is stippled to give the light a super smooth soft edged fall off.

2. I use a Tiffen Black Pro Mist filter with ¼ strength to give a subtle diffused look to my Hollywood images. An old lens from the 1950s or 60s used via an adapter can also work well.

3. A Scattergel or other gobo (go between) is used to break up the light to create mood and ambience. This simple piece of kit really delivers the icing on the cake.

4. Barn doors on the back lights stop the chance of flare and help to keep the image shadows under control. Barn doors on the key light keeps the spill light off the background.

5. A reflector just out of shot from the side is great for controlling contrast. I use an original Triflector I bought way back in the 1990s. It works well from the sides as well as from underneath.

11. From left to right Lupolux LED 1000 daylight balanced spotlight, Arri 300 junior tungsten spotlight and Arri 150 junior tungsten spotlight.

13. From left to right Lupolux LED 1000 daylight balanced spotlight, Arri 300 junior tungsten spotlight and Arri 150 junior tungsten spotlight.


10. The Tiffin Black Pro Mist filter to take the edge off my digital files. 1/4 strength or even 1/2 is best for this kind of work.

14. The Tiffin Black Pro Mist filter to take the edge off my digital files. ¼ strength or even ½ is best for this kind of work.


A cold running Lupolux LED 1000 with a Scattergel attached

15. A cold running Lupolux LED 1000 with a Scattergel attached.

Behind the scenes on set:

Take the Hollywood look on location to bring a space to life. Fresnel spotlights have a long throw and can be used to light large areas from a distance. I used just three Lupolux LED spotlights for this shot. It was a commission for a poster campaign for the Bristol Museum events department. I started by rigging Victoria’s key light, a Lupolux LED 650 with a Scattergel This light picks up on the lion and the stairs too. The light at the top of the sketch plan shows Victoria’s backlight. This is a Lupolux LED 1000 in full spot mode rigged two floors up pointing down over the balustrade. The third light in the set is lighting the back wall. I used another Lupolux 1000 LED and a Scattergel from a position out of shot on the right at the top of the stairs. I lit the statue on the half landing with this light too.

13. This is the lighting plot for the shot below.

16. This is the lighting plot for the shot below.


14. The final shot used for the launch of the Bristol Museum as an event venue.

17. Here is the final shot used for the launch of the Bristol Museum as an event venue. It was used on posters, brochures and their website.

On a budget?

If you can’t afford the HMI or LED fresnel spotlights from Lupolux, tungsten fresnel spotlights are still available from Arri and cost less than a Canon or Nikon Speedlight. I recommend the 650, 300 and 150 in the junior series. Speedlights with grids can get you 90% of the look but without modelling lights they can be hard to set up and rely on test and measure to achieve a good power balance. Studio lights are a better option if you want to try and achieve this look with flash because they have modelling lights but you might not be able to achieve f/1.4 even with the flash set to minimum power. There are expensive fresnel adaptors available for studio flash systems but they don’t have the control and versatility of a dedicated light. I’d say use the cheaper 18cm reflectors instead fitted with 20 degree honeycomb grids to get near the look you want. Set the flash power to minimum on your most powerful unit and balance the power of the other units to taste. Using flash will create a darker shooting environment because the modelling lights are a fraction of the power of continuous lights so take care when focussing.

15. This lighting style works well in colour too. This boudoir shot of Chantelle Hole was lit with one Lupolux LED 650 and a Scattergel. Notice how narrow the light makes Chantelle’s face. The Scattergel makes the lighting look exciting.

18. This lighting style works well in colour too. This boudoir shot of Chantelle Hole was lit with one Lupolux LED 650 and a Scattergel. Notice how narrow the light makes Chantelle’s face. The Scattergel makes the lighting look exciting.

Glossary

  • Barn doors: The metal flaps on a light fixture used to control spill or to create a rectangular shaped light pattern.
  • Scattergels: A screen printed acrylic sheet with regular or irregular patterns used to break up the light to created a dappled effect.
  • Fresnel: The name of the guy who gave his name to a compact lens made up of concentric rings. Often found in lighthouses, on the front of Speedlights and in film and TV luminaires.
  • Luminaire: The posh term for a continuous lighting fixture.
  • Kick light: A kick light glances the cheek of the subject from behind and to the side. It creates a light band, often blown out to white from the specular reflections off the skin.
  • Back light: A back light is rigged on the opposite side of the subject to the camera irrespective of the direction the subject is facing in.
  • Key light: The key light is the principal light and it doesn’t necessarily have to come from the front it can land on the subject from any angle.
  • Down the nose: This refers to the direction of a light. If the subjects nose was very long it would touch the lighting stand if a ‘down the nose’ lighting direction is used.

Feel free to comment below, sign up for our newsletter or join me on a photography adventure.

The post How to ~ Hollywood Portraits appeared first on ProPhotoNut.

Melanie Beckendorff-Leavens ~ Boudoir with Fuji X-T1

$
0
0

It’s not often I get to stay in a penthouse apartment, but that’s what Blaise, my PA arranged for me when I shoot the boudoir workshop in Copenhagen last week. It was quite an ominous challenge to shoot in a space so stark but one we all benefitted from. There were two shades of tone before us, black and white. Here are 31 photographs from my set.

01.

01. Patterns created by sunlight formed the basis of the first few shots of the day.

The apartment we shot in has walls of glass with one layer of black mesh curtains in front of another layer of black blackout curtains. We had sun on and off throughout the day so we took control of the lighting and made our own sunlight with the Lupo LED 1000 spotlight when it was needed.

Model: Melanie Beckendorff-Leavens
Camera: Fujifilm X-T1 with 16mm, 35mm, 56mm and 90mm primes plus a Fuji X100T
Lighting: One Lupo LED 1000 Fresnel plus Scattergel.

02.

02. The penthouse apartment bathed in glorious sunlight. X-T1, 16mm lens at f/11, 1/180th second, ISO 200.

03.

03. I used the Fuji X100T with it’s 23mm lens at f/2.2, 1/500th second at ISO 200 for this shot of Melanie.

04.

04. Fabulous legs captured with the Fuji X-T1 with the 56mm lens at f/2.8 for 1/180th second at ISO 200. I love the curves and shape created by the underside profile of Melanie’s right leg. These naturally occurring shapes excite me.

05.

05. Simple design elements come together easily when lighting patterns create diagonals and repeating shapes. Fuji X-T1 56mm lens at f/16 for 1/180th second at ISO 200.

06.

06.The window light here is coming through partly closed curtains and comprises reflected sunlight off buildings under construction and a kick reflection from the shiny floor. (Left) Fuji X-T1 with 90mm lens at f/2, ISO 1000 and 1/180th second. (Right) Fuji X-T1 with 35mm lens, f/1.8 at ISO 400 and 1/60th second.

07.

07. Melanie is a model with a wealth of experience and can pull shapes with ease. I lit her with one Lupo LED 1000 with a Scattergel from above the camera and she is standing 1.5 metres from the wall. I chose 1/500th second to freeze here movement and got into a shoot/ pose rhythm. All we used was 1.5m of plain wall and we have a ‘fashion’ magazine look shoot. With just one light this took moments to set up and can be created anywhere. We closed the curtains to keep the contrast high. Fuji X-T1 with 56mm lens at f/1.2, 1/500th second at ISO 400.

08.

08. Simply beautiful and beautifully simple photography in a high contrast environment. I love to keep the skin tones calm and the shapes elegant. Fuji X-100T 1/125th second at f/4, ISO 200. The X100T has the same sensor and quality as the X-T1 and at f/4 the optical image quality is indistinguishable from the larger XF23mm f/1.4 lens.

09.

09. There’s nothing quite like a cold stainless steel work surface to lye on. We refrained from running the cold tap and having water cascading over Melanie and down onto the floor. I used the Lupo LED 1000 to give the shot some punch. You can spot the light intensity by looking at the shadows. Fuji X-T1, 90mm lens at f/2, 1/250th second at ISO 200.

10.

10. Tutu is an ongoing project of mine and will become a book one day. This apartment is a vision of minimalist living. Fuji X100T, f/2.2, 1/250th, ISO 200.

11.

11. I love to explore angles and viewpoints of jawlines and cheekbones. Crisp, hard light is the most wonderful at sculpting the face. Lupo LED 1000, Fuji X-T1, 90mm lens at 1/250th second and ISO 200. I’m really getting to grips with the 90mm lens now and I find that 1/250th is fine for hand held use with care. At 1/180th second I’m getting 1 in 3 shots soft due to camera movement.

12.

12. For the shower scene we shot high contrast and low contrast placing the Lupo 1000 in the toilet cubicle. I powered the Lupo from battery to avoid any safety issues and to keep trailing leads out of the shot. Fuji X-T1, 16mm lens at f/2.2 for 1/180th second at ISO 400.

13.

13. We completely changed the look for these delicate high key versions. Fuji X-T1, 90mm lens at f/2 for 1/180th second at ISO 400.

14.

14. The bed scene was back lit with the Lupo 1000 to give a bright sunny feel at a time in the day when the sun was on another part of the building. All shots here were taken with the Fuji X-T1 with the 35mm at f/4 for 1/180th second and ISO 400

15.

15. Because of the action I set a shutter speed of 1/500th second and decided to light Melanie with a Lupo 1000 spotlight. I shot at f/5 using manual focus and an ISO setting of 800. Fuji X100T

16.

16. Take one chair, plus a piece of furniture just out of shot for shadow purposes and add beautiful light from the Lupo 1000 with a Scattergel and you have a stunning shot. To add more interest we popped Melanie into the shot too ;) Fuji X100T, f/2.8 at 1/125th and ISO 640.

17.

17. Natural light bathed Melanie from upstage. Fuji X-T1, 56mm lens at f/2.5 using 1/180th second and ISO 1000.

Please feel free to leave a comment below and ask a question about the images or my workshops. What is your favourite image and why? I’d love to know.

The post Melanie Beckendorff-Leavens ~ Boudoir with Fuji X-T1 appeared first on ProPhotoNut.

Mischkah Scott in Spain – nsfw – Fuji X-T1 with primes

$
0
0

Location: El Puerto de Santa Maria, Andelucia, Spain
Tour hotel: Palacio San Bartolome
Location manager and tour fixer: César at Scout Location Spain (link to come soon)
UK planning: Laura Haskins and Blaise Parsons
Model: Mischkah Scott ~ PP profile.

01.

01. Location 1 is this abandoned farmhouse fifteen minutes drive from our tour hotel. It comes with a horse and needs some DIY kindness. Top: 56mm, ISO 200, f/8 at 1/1000th second. Bottom: 35mm, ISO 200, f/3.6 at 1/500th second.

Photographs: Damien Lovegrove
Camera: Fuji X-T1
Lenses: XF 16mm f/1.4, XF 23mm f/1.4, XF 35mm f/1.4, XF 56mm f/1.2 and XF 90mm f/2
Lighting kit: Lupo Dayled 1000 with V-lock battery, Cactus RF60 and Cactus V6 tranceiver.

During the workshop there were times where the Fuji users amongst us swapped lenses to gain experience with other optics. That is why some of the shots in this set were taken on the 14mm and 50-140mm lenses.

02. Mischkah stands in the perfect place to make use of the window light. 16mm, ISO 250, f/1.4 at 1/60th second.

02. Mischkah stands in the perfect place to make use of the window light. 16mm, ISO 250, f/1.4 at 1/60th second. I set the white balance to 7200K because Mischkah was lit by the light from a pale blue sky coming through the window.

spain-09

03. Left and right: 35mm, ISO 250, f/1.4 at 1/60th second using natural light.

I love the textures and tones in the building fabrics in Spain. The weather too. I like to extend my summer with a workshop tour in Spain in September. The 14 degree difference is very welcome with mean daily temperatures in this part of Spain at 31°.

03.

04. Just a bit further into the building we were up to ISO 1000. 16mm lens at f/2.8 to capture the rich textures in sharp focus.

04.

05. We used the light as it presented itself (left) and I rigged my own sunlight for the shot on the right so I could choose exactly where to place Mischkah. I used a Lupo LED 1000 running on battery power with a Scattergel to make my sunlight. It’s great having wonderful continuous light as we could all shoot at the same time without having to wait for a flash trigger. The light pattern and quality is far nicer than a Speedlight or big flash too. I dimmed the Lupo to give a pleasant balance with the background environment. You can see the window in the background of the picture on the right that was used as the light source in the shots 2, 3 and 4 above. Right: 16mm, ISO 800, f/1.4 at 1/180th second. Left bottom: 56mm, ISO 500, f/2.2 at 1/180th second.

05.

06. Hazy sunlight coming through a window is a wonderful light to work with. Unfortunately the sun was on the other side of the building so we used a Lupo LED 1000 instead to make our sunlight. The Lupo gives a crisp light that makes skin come alive and defines shapes beautifully. I’m often asked ‘What lens should I get next to improve my photography?’ My answer should be ‘Get a decent light’. The price of a great light is about the same as a great lens and the light will transform the scene in a way that no lens can. It’s not all about the kit though. When I’m shooting, I have very little conciseness of the camera and lens I’m using. It’s all about the subject. I directed Mischkah’s attitude and her confrontational stance in this shot. I composed using lead in lines and a low viewpoint and the flip out screen on the X-T1 prevented me from having to lie in the dirt. 16mm, ISO 500, f/1.6 at 1/180th second.

06.

07. I swapped lenses with a delegate and used his 50-140mm zoom for these shots. I really like the 50-140 out on location and it is definitely a fabulous lens to shoot with. The weight in the camera bag and on the camera is the key downside to the fast zoom. ISO 200, f/2.8 and 1/250th second.

07.

08. Nothing beats crisp hard sunlight. 90mm, ISO 200, f/4.5 at 1/2000th second.

08.

09. Settings as picture 8.

09.

10. Our second location was an unfinished mansion. The owner arrived on cue and unlocked the gates to give us unrestricted access to this fabulous place. César, our location scout negotiated well and secured us some wonderful locations. 56mm lens, ISO 200, f/9 and 1/500th second.

10.

11. I love the way sunlight casts patterns on Mischkah’s shoulders. 56mm, ISO 200, f/6.4 and 1/500th second.

11.

12. A white horse decided he wanted to be the star and Mischkah bravely approached with caution. The horse was kicking his back legs. I’m no animal psychologist but I definitely thought it might be a warning. 16mm, ISO 200, f/8 and 1/500th second.

12.

13. The attitude of the horse works really well here and I directed Mischkah to go up onto tiptoes. 90mm, ISO 200, f/7.1 and 1/500th second. Another horse and it’s foal came over to us and then they all wandered off.

13.

14. The sunlight wrapped around the side of the building and Mischkah braved a difficult route to arrive on the balcony. Left: 56mm, ISO 200, f/5 and 1/500th second. Right: 16mm, same exposure.

14.

15. ‘Contemplation’ 35mm lens, ISO 200, f/7.1 and 1/180th second.

15.

16. Mischkah is a star, putting up with some grotty locations to enable us to create the shots. Nude photography success is all about the attention to detail, heals off the ground, enclosed triangles, contre-jour, lead in lines and upright verticals all play their part. Left: 35mm, ISO 200, f/3.2 and 1/180th second. Right: f/2.5.

16.

17. I closed all the shutters on the first floor and opened one set just a crack to give us high contrast and a virtual striplight to work with. Both: 90mm, ISO 400, f/2 and 1/250th second.

17.

18. My favourite shot of the set is this beautiful moment. 90mm, ISO 400, f/2 and 1/250th second.

18.

19. Wonderful skin. There’s so much wrong with this image including the high viewpoint and extreme perspective but so much right too in my eyes. 90mm, ISO 1600, f/2, for 1/250th second.

19.

20. This niche is just inside the main door of the mansion and was the perfect backdrop for a few shots of Mischkah with my tutu.

20.

21. It was time to introduce the Cactus RF60 Speedlight. I rigged it very high on the Lastolite Jupiter stand and shone it through the tree growing outside the shaded front of the building. I then swung it round to glance the niche with a slash of light. Left: 23mm lens Right: 35mm lens, ISO 200, f/4 and 1/180th second.

21.

22. The cave was our next location and wow it was dark. We were there a bit late in the day and the natural light failed to penetrate like it had done on my recce earlier in the year. We had to negotiate some fencing and scramble down into the old mine workings. I had brought my Lupo 1000 LED spotlight and battery kit with me so I set that up with a Scattergel and we were able to shoot using monopods or high ISO. I had to dim the light right down to create a balance with what little ambient light there was. Top left and right: 16mm, ISO 1250, f/1.4 and 1/60th second. Bottom left: 23mm, ISO 800, f/1.4 and 15th second.

22.

23. Cotton is fluffy stuff. I’ve never seen cotton before so I shot a close up to remind myself what it looks like. Mischkah looks great in the evening light. 90mm lens, ISO 200, f4 and 1/500th second.

23.

24. The city of Cadiz is full of four storey town houses and we were privileged enough to spend a couple of hours shooting in one, much to the amusement of the father of the house. The children were ushered out with their mother leaving the grand parents in their wonderfully furnished home. I lit Mischkah here with a Lupo 1000 LED light and Scattergel. 23mm lens, ISO 800, f/1.4 and 1/125th second. The light level was set to give just the right amount of contrast.

24.

25. We used the light from a window for this shot at the great mirror. 23mm lens, ISO 500, f/1.6 and 1/60th second.

25.

26. Both these shots were lit with the Lupo and shot using the 23mm lens. ISO 800, f/2.8 and  1/125th second.

26.

27. I love this natural light shot, maybe more than the one I shot back on the recce here. I used the wonderful 23mm lens wide open at f/1.4 with ISO 500 and 1/60th second.

27.

28. The marble floor is a wonderful geometric pattern to use as a backdrop. 35mm lens, ISO 500, f/1.4 and 1/125th second.

28.

29. The streets of Cadiz formed the backdrop to a couple of frames on our way to lunch at a wonderful restaurant. The food in Spain was excellent, the wine too. Top: Natural sunlight, 16mm lens, ISO 200, f/7.1 at 1/250th second. Bottom: Cactus RF60 speedlight, 16mm lens, ISO 200, f/11 and 1/180th second.

29.

30. We used an unfinished house by the beach to do a mini posing workshop. Left: 16mm, ISO 250, f/1.4 and 1/250th second. Right: 56mm, ISO 200, f/1.6 and 1/250th second.

30.

31. The beach in morning light was fabulous. I picked up the yellow dress in Primark and it works so well on Mischkah. I used a borrowed 14mm lens as I had leant out my 16mm. ISO 200, f/9 for 1/500th second.

31.

32. 35mm lens, ISO 200, f/10 for 1/500th second.

32.

33. These three shots were taken with the 90mm lens. ISO 200, f/8 at 1/500th second.

33.

34. The fabulous beach and waterfront at El Puerto de Santa Maria. 14mm, ISO 200, f/8 for 1/180th second.

34.

35. Rocky fashion with the 35mm lens. ISO 200, f/13 and 1/180th second.

35.

36. I love this Mondrian inspired bikini. Just the simple transfer of weight held back by a grip on the rock gives this shot a figurehead type dynamic. 90mm lens, ISO 200, f/3.2 at 1/500th second.

36.

37. 90mm lens, ISO 200, f/11 and 1/500th second.

37.

38. 90mm lens, ISO 200, f/8 and 1/500th second.

38.

39. All three shots were taken with the 90mm lens.

39.

40. We lost the sun for a short while on the last day so I rigged my Lupo LED 1000 as a backlight and showed the group how I shoot into the light to make bright high key images in overcast light. 56mm, ISO 800, f/1.2 and 1/250th second.

40.

41. The fast, wide primes are my lenses of choice. 16mm, 23mm and 35mm all at f/1.4. I use the lenses at maximum aperture and I can get away with 1/125th second with them all if I’m careful. This is a two stop advantage over the heavier 16-55 f/2.8 zoom. That 2 stops is the difference between shooting at ISO 400 or ISO 1600 and makes a real world difference to image quality. For the tight end there is a real choice between the 56mm f/1.2 combined with the 90mm f/2 or the 50-140mm f/2.8 IS lens. The 90mm lens has a one stop advantage over the 50-140mm lens  and focusses closer too. However I need at least 1/250th second to avoid camera shake and I often find myself selecting 1/500th just to be sure. I shoot the 50-140mm lens at 1/125th second all the time and if my subject is still I happy shooting it at 1/60th too. The IS is amazing. I chose to take the two primes on this workshop but I’d have been just as happy, if not slightly happier with the one 50-140mm zoom lens. The zoom lens really is that good.

This is a fraction of my photographs from three days in Southern Spain with a fabulous model and a wonderful camera system. I made new friends and were reacquainted with others. If you want to join me on a photographic adventure, start by joining the Lovegrove Creative Group on Facebook. Forthcoming trips in 2016 include a USA road trip, Venice and Tuscany among others. Fun, friendships, photography and adventure assured.

Please feel free to comment below…

The post Mischkah Scott in Spain – nsfw – Fuji X-T1 with primes appeared first on ProPhotoNut.

Viewing all 174 articles
Browse latest View live